


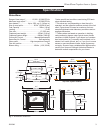

11
WinterWarm Fireplace Insert or System
2000941
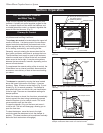
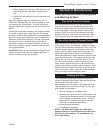
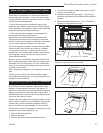
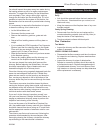
Replacing the Door Gaskets
Remove the door by lifting it straight up off its hinge
pins. Lay it face down on a padded surface.
Follow steps 1-4 as described above.
FP1077
Winter Warm
door gaskets
3/28/01 djt
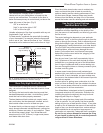
#1 Gasket
#2 Gasket
#3 Gasket
Fig. 10 Location of door gaskets.
FP1077
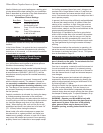
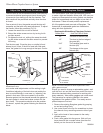
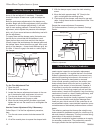
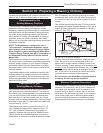
Replacing the Damper Gasket
Remove the front grate, bottom grate, ash pan, and ash
pan frame.
Follow steps 1-4 as described above.
FP1078
WinterWarm
damper gasket
3/28/01 djt
#4 Gasket
3/8” (10mm) Tail
FP1078
Fig. 11 Location of damper gaskets.
Permanent WinterWarm Gaskets
Gasket size... ...And The Parts It Seals
1/2” The underside of the top plate to
the top edge of the air manifold
5/16” The flue collar to the top plate
5/16” The right end of the air
manifold to the right side plate
5/16” The left end of the firechamber to
the left end of the air manifold
5/16” The bottom edge of the lower
firebackto the bottom plate
5/16” and 3/8” The ends of the upper fireback to
the lower fireback and to the ribs
of the right and left side plates
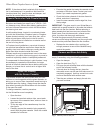
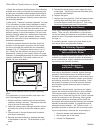
Replace Damaged Door Glass Immediately
Do not operate the WinterWarm with a damaged glass
(or screen) cassette. Use the following procedure for
cassette replacement.
NOTE: Replace glass only with CFM Corporation high
temperature ceramic glass, available from your Ver-
mont Castings’ Authorized Dealer.
• Open the door and loosen the two retaining clips, one
at each upper corner, which hold the cassette to the
door frame. Swing the clips out of the way. Tilt the cas-
sette away from the door frame and lift up. Use caution
when handling a cassette that contains broken glass.
• Examine the gasket that seals the cassette to the
door frame. Replace if necessary with gasket obtained
from your local Vermont Castings’ Authorized Dealer.
See the directions for gasket replacement on page 9.
• Check the channel at the bottom of the door frame,
and clear away debris if necessary.
IMPORTANT: The glass used in your WinterWarm is
coated with a special material on one side that reflects
heat back into the fire chamber. Before replacing a
glass cassette that has been removed, examine the
metal frame. One side has smooth, mitered corner
joints; the other side has rough weld marks.
To install the glass correctly, the smooth mitered
corners must be facing the gasket and the rough weld
marks must be positioned toward the fire chamber.
• Secure the clips, being careful not to over-tighten. Be
sure the cassette is firmly seated against the gasket.
Close the door gently to confirm that the clips have
been properly positioned. It is possible for the glass to
be damaged if the clips have been installed incorrectly
and the door is closed with force.
Other gaskets form seals between non-moving parts,
but these are not subject to the same wear and dete-
rioration as gaskets on moving parts. It is unlikely that
you will ever need to replace these gaskets unless the
involved parts are disassembled and then put back
together. In any event, this is a job that should be done
only by qualified service personnel.