


20
WinterWarm Fireplace Insert or System
2000941
FP1087
WW
Fle
x connector
3/30/01 djt
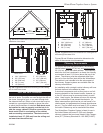
Flex Connector
1/4” (6mm)
Nut
Pipe
Support
1/4” (6mm)
Nut
Pipe
Support
Block-Off
Plate
1/4”
(6mm)
Screw
Starter Piece
(Optional)
1/4” (6mm)
Wing Nut
1/4” (6mm)
Washer
1/4” (6mm) Bolt
FP1087
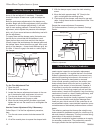
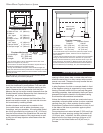
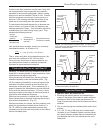
Fig. 22 Components of the Flex Connector System.
Consult a Vermont Castings’ Authorized Dealer for in-
stallation suggestions. It may be possible to enlarge the
opening by removing or modifying the damper frame,
but do this only if it won’t weaken the fireplace. Check
with your local building inspector to be sure modifica-
tions comply with local codes.
Although the Flex Connector is designed to be installed
by any mechanically competent person, wide variations
in fireplace and damper construction can complicate
the installation. You may wish to have the job done
by a professional installer. Complete detailed installa-
tion instructions are included with the Flex Connector
components.
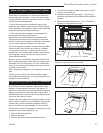
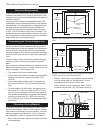
A Custom Damper Seal
If the design of your fireplace damper prohibits the use
of the CFM Corporation Sealing Package, an alterna-
tive is to fabricate a custom sealing plate at or below
the fireplace damper frame. The plate can be fastened
securely to the lintel (the structural piece spanning the
fireplace opening) and to the surrounding masonry, or
be securely fastened to the damper frame. A section
of chimney connector, attached to the WinterWarm
flue collar, must make a positive flue connection where
required by code.
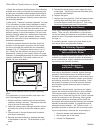
A Relined Chimney
There are a number of fittings available from your Ver-
mont Castings’ Authorized Dealer that are designed to
form the connection between your WinterWarm and an
8” (203mm) diameter chimney liner. Your dealer as well
as your local chimney sweep can advise you on the
types of lining systems currently available.
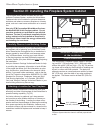
Preliminary Steps for Installing the
WinterWarm into a Masonry Fireplace
1. Remove the Masonry Fireplace Damper
The existing damper plate within your fireplace must
be removed or, if that is not possible, must be fastened
securely in a fully-open position. Many dampers can
be removed simply by removing a cotter pin and/or set
screw.
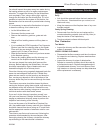
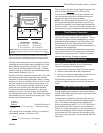
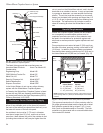
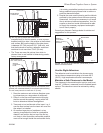
2. Install the Flex Connector
Following the installation instructions that are packed
with the Flex Connector, unfold the template that came
with the WinterWarm. (Fig. 23) Carefully glue the tem-
plate onto a large piece of sturdy cardboard or plywood,
making sure that the fold lines have been flattened. Cut
along the edges of the template and use it to place the
Flex Connector components correctly in your fireplace.
Custom Fabrication:
Be sure any chimney connector or adapter is properly
installed and secured in place. There should be a slip
joint near the WinterWarm so that the connection can
be easily disengaged for removal and cleaning of the
unit.
FP1088
WinterWarm
template
3/30/01 djt
Template
FP1088
Fig. 23 Using the template that came with the WinterWarm
will help you position Flex Connector.