


31
Unit Start-Up Heating Mode
NOTE: Operate the unit in heating cycle after checking the
cooling cycle. Allow 5 minutes between tests for the pressure
or reversing valve to equalize.
1. Turn thermostat to lowest setting and set thermostat
switch to HEAT position.
2. Slowly turn the thermostat to a higher temperature until
the compressor activates.
3. Check for warm air delivery at the unit grille within a few
minutes after the unit has begun to operate.
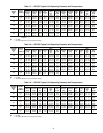
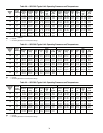
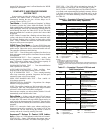
4. Check the temperature of both supply and discharge wa-
ter. Compare to Tables 16-22. If temperature is within
range, proceed. If temperature is outside the range, check
the heating refrigerant pressures in Tables 16-22.
5. Once the unit has begun to run, check for warm air deliv-
ery at the unit grille.
6. Check air temperature rise across the coil when compres-
sor is operating. Air temperature rise should be between
20 and 30 F after 15 minutes at load.
7. Check for vibration, noise and water leaks.
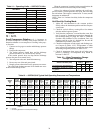
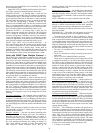
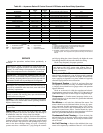
Unit Start-Up with WSHP Open Controls —
The WSHP Open is a multi-protocol (default BACnet*) con-
troller with extensive features, flexible options and powerful
capabilities. The unit comes from the factory pre-programmed
and needs minimal set up to function in a BAS (Building
Automation System) system or provide additional capabilities
to Carrier's WSHP product line. Most settings on the controller
have factory defaults set for ease of installation. There are a
few settings that must be configured in the field and several
settings that can be adjusted if required by unique job condi-
tions. Refer to Appendix A — WSHP Open Screen Configura-
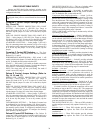
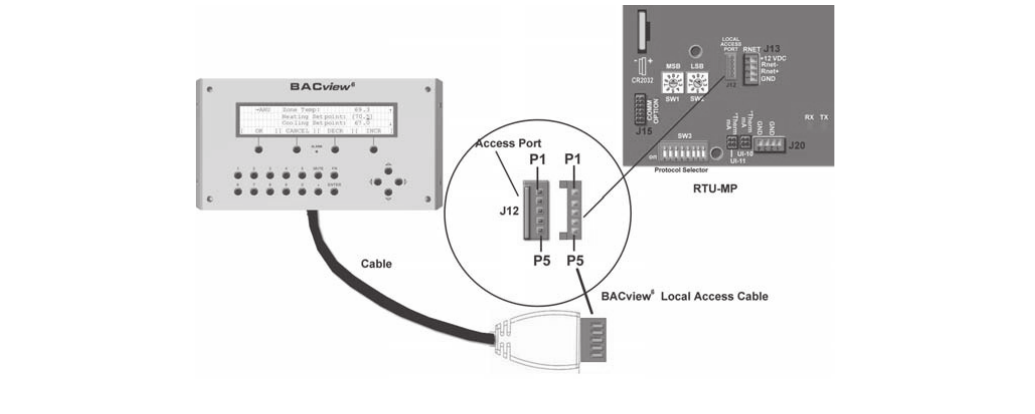
tion. In order to configure the unit, a BACview
6
display is
required. See Fig. 31.
NOTE: If the WSHP Open control has lost its programming,
all display pixels will be displayed on the SPT sensor. See the
WSHP Third Party Integration Guide.
When the unit is OFF, the SPT sensor will indicate OFF.
When power is applied, the SPT sensor will indicate tempera-
ture in the space at 78 F.
To start-up a unit with WSHP Open controls:
1. To plug in the BACview
6
handheld display into a SPT
sensor, point the two ears on the connector up and tilt the
bottom of the plug toward you. Insert the plug up into the
SPT sensor while pushing the bottom of the plug away
from you.
2. BACview
6
should respond with "Establishing Connec-
tion." The Home screen will then appear on the display
showing operating mode and space temperature. Press
any button to continue.
See Appendix A — WSHP Open Screen Configuration
for the hierarchal structure of the WSHP Open controller.
All functions of the controller can be set from the Home
screen.
3. When the Login is requested, type 1111 and push the OK
softkey. The Logout will then be displayed to indicate the
password was accepted.
4. To set the Clock if it is not already displayed:
a. Select System Settings from the Home screen, then
press Clockset.
b. Scroll to hour, minute and second using the arrow
keys. Use the number keypad to set actual time.
c. Scroll to day, month and year using arrow keys.
Use number keypad to set date.
5. To set Daylight Savings Time (DST):
a. Push the DST softkey. The display will indicate
02:00:060 which is equal to 2:00AM.
b. To program the beginning and end dates, scroll
down to the beginning month and press the enter
key. The softkeys (INCR and DECR) will activate
to increment the month in either direction, Jan,
Feb, March, etc.
c. Use number keys to select the day of month and
year.
d. Push the OK softkey to finalize the data.
6. To view configuration settings:
a. Select the Config softkey.
b. Select the Service Config softkey. Scroll through
the factory settings by using the up and down
arrow keys. See below for factory settings.
Only the following settings will need to be
checked.
• # of Fan Speeds — This should be set to "1" for
units with PSC motors and set to "3" for units with
ECM motors.
• Compressor Stages — This should be set to "1."
• Factory Dehumidification Reheat Coil — This
should be set to "none" unless the modulating hot
water reheat option is supplied in the unit, then set
to "installed."
Fig. 31 — BACview
6
Display Interface
a50-8444
*Sponsored by ASHRAE (American Society of Heating, Refrigerat-
ing and Air Conditioning Engineers).