


48
FAN SHAFT BEARINGS — Lubricate bearings at least ev-
ery 6 months with suitable bearing grease. Typical lubricants
are given below:
*Preferred lubricant because it contains rust and oxidation inhibitors.
FAN MOTOR BEARINGS — Fan motor bearings are of the
permanently lubricated type. No field lubrication is required.
No lubrication of the condenser or evaporator motors are
required.
Manual Outdoor Air Damper — If manual outdoor
air damper blade adjustment is required, refer to Step 10 — In-
stall Outdoor Air Hood section on page 12.
Economizer Adjustment — If economizer adjustment
is required, refer to Optional EconoMi$er IV section on
page 39.
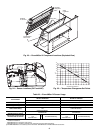
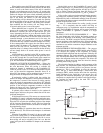
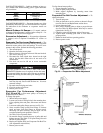
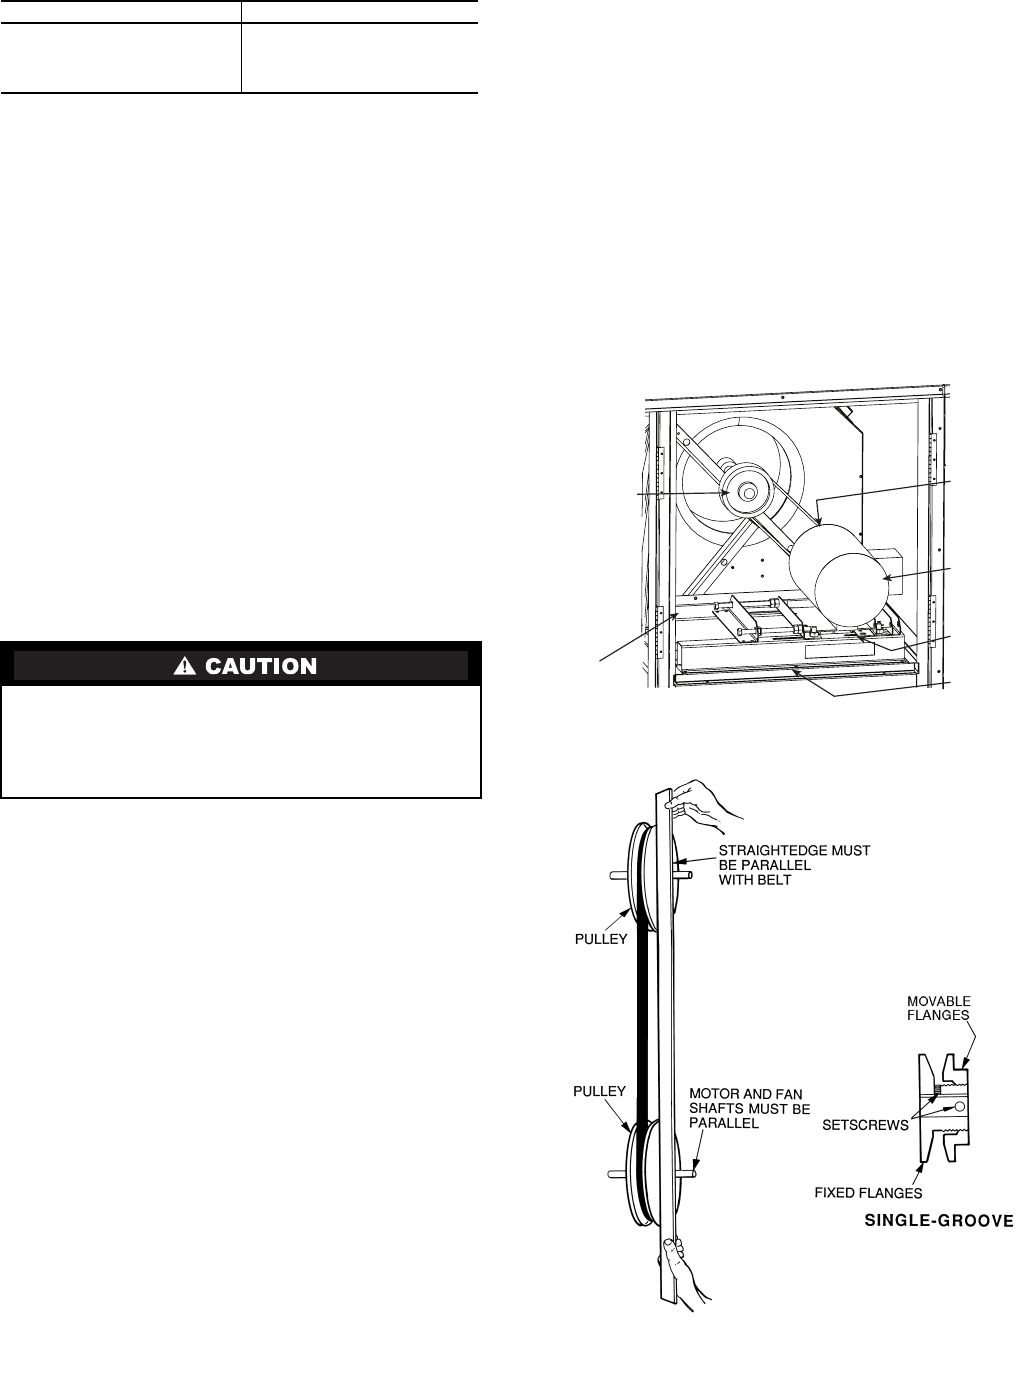
Evaporator Fan Service and Replacement — The
48PG units feature a slide-out fan deck for easy servicing of the
indoor-fan motor, pulleys, belt, and bearings. To service com-
ponents in this section, perform the following procedure:
1. Turn off unit power.
2. Open the fan section access panel.
3. Remove three no. 10 screws at front of slide-out fan deck.
Save screws. See Fig. 33.
4. Disconnect the limit switch wires located on the right
side of the fan deck. Other wires do not need to be
disconnected.
5. Fan deck can now be slid out to access serviceable
components.
6. To replace fan deck to operating position, slide fan deck
back into the unit. Secure with the three no. 10 screws
removedinStep3.
7. Re-attach electrical plugs and wires.
8. Close fan section access door.
9. Restore power to unit.
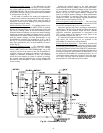
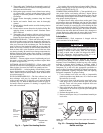
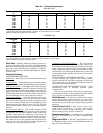
Evaporator Fan Performance Adjustment
(Fig. 33 and 34) —
Fan motor pulleys are factory set
for speed shown in Table 27.
To change fan speeds:
1. Shut off unit power supply.
2. Loosen nuts on the 4 carriage bolts in the mounting base.
Using adjusting bolts and plate, slide motor and remove
belt.
3. Loosen movable-pulley flange setscrew (see Fig. 34).
4. Screw movable flange toward fixed flange to increase
speed and away from fixed flange to decrease speed.
Increasing fan speed increases load on motor. Do not
exceed maximum speed specified in Table 27.
See Table 24 for air quantity limits.
5. Set movable flange at nearest keyway of pulley hub and
tighten setscrew. (See Table 27 for speed change for each
full turn of pulley flange.)
6. Replace and tighten belts (see Evaporator Fan Belt Ten-
sion Adjustment section below).
7. Restore power to unit.
To align fan and motor pulleys:
1. Loosen fan pulley setscrews.
2. Slide fan pulley along fan shaft.
3. Make angular alignment by loosening motor from
mounting plate.
Evaporator Fan Belt Tension Adjustment — To
adjust belt tension:
1. Turn off unit power.
2. Slide out fan deck to service position as shown in Evapo-
rator Fan Service and Replacement section above.
3. Loosen fan motor bolts.
4. Move motor mounting plate to adjust to proper belt ten-
sion. See Table 30. Motor adjuster bolts may be used to
tighten belts. See Fig. 33.
5. Check for proper belt alignment. Adjust if necessary.
6. Tighten motor mounting plate bolts to lock motor in
proper position.
7. Return fan deck back into operating position.
8. Restore power to unit.
MANUFACTURER LUBRICANT
Texaco Regal AFB-2*
Mobil Mobilplex EP No. 1
Sunoco Prestige 42
Texaco Multifak 2
DO NOT SLIDE FAN DECK OUT PAST THE STOP
BRACKET. If further access is required, the fan deck must
be supported. Make sure plugs and wiring are not pinched
between fan housing and unit center post. Damage to unit
may result.
FAN
PULLEY
MOTOR
MOUNTING
BASE
MOTOR
PULLEY
(HIDDEN)
SLIDE-OUT
FAN DECK
LIMIT
SWITCH
QUICK
CONNECT
Fig. 33 — Evaporator-Fan Motor Adjustment
Fig. 34 — Evaporator-Fan Alignment
and Adjustment