


1 —
2 —
3 —
4 —
5 —
6 —
7 —
8 —
?
!
9 —
CONTENTS
Index
■ Attaching the Walking Foot .......... 1-40
■
Reattaching the Presser Foot Holder ...
1-42
Changing the Needle .......................... 1-43
■ About the Needle ......................... 1-45
■
Fabric/Thread/Needle Combinations ..
1-45
Chapter 2 Getting Ready to Sew
TRIAL SEWING..................................... 2-1
Basic Sewing ......................................... 2-1
Sewing Reinforcement Stitches.............. 2-3
Changing Sewing Direction................... 2-3
Sewing Curves ...................................... 2-3
Sewing Heavyweight Fabrics................. 2-4
Sewing Lightweight Fabrics ................... 2-4
Using the Twin Needle Mode ................ 2-5
STITCH SETTINGS ................................ 2-8
Setting Stitch Width for Zigzag Stitch
Patterns ................................................. 2-8
Setting the Stitch Length ........................ 2-9
■ Stitch Pattern Width/
Stitch Length Settings Table .......... 2-10
Setting the Thread Tension .................. 2-13
■ Proper Thread Tension .................. 2-13
MACHINE FUNCTION SETTINGS...... 2-14
Automatic Reinforcement Stitching ..... 2-14
Using the Automatic Thread Cutter ..... 2-15
Chapter 3 Sewing Utility
Stitches
QUICK REFERENCE TABLE ................... 3-1
SELECTING UTILITY STITCHES ............ 3-9
Selecting a Stitch Pattern ....................... 3-9
■ Stitch Selection Screens ................ 3-10
■ Using the Mirror Image Key........... 3-11
■
Saving Your Preferred Stitch Settings
3-12
Using the Sewing Type Selection Key .. 3-13
SEWING THE STITCHES ..................... 3-16
Straight Stitches ................................... 3-16
■ Changing the Needle Position
(Left Needle Position Patterns Only)
3-18
Basting ................................................ 3-19
Zigzag Stitches .................................... 3-20
CONTENTS
WHAT YOU CAN DO WITH THIS MACHINE
Special Features
HOW TO USE THIS MANUAL
Chapter 1 Setting Up
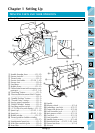
PRINCIPAL PARTS AND THEIR
OPERATION ......................................... 1-1
Principal Parts ....................................... 1-1
■ Embroidery Unit ............................. 1-2
■ Hard Case ...................................... 1-2
■ Embroidery Unit Storage Case ........ 1-2
■ Operation Buttons .......................... 1-3
■ Balance Wheel ............................... 1-4
■ Presser Foot Lever .......................... 1-4
■ Sewing Speed Controller ................ 1-4
■ Bobbin Winder Button.................... 1-4
■ Top Cover ....................................... 1-5
■ Supplemental Spool Pin ................. 1-5
■ Free Arm ........................................ 1-5
■ Feed Dog Position Switch............... 1-6
■ Presser Foot Dial ............................ 1-6
■ Knee Lifter ...................................... 1-6
■ Foot Controller ............................... 1-7
Included Accessories............................. 1-8
Options ............................................... 1-10
■
When Using the Multi-thread Stand
1-10
BASIC OPERATION ............................ 1-12
Connecting the Power ......................... 1-12
Viewing the LCD Display .................... 1-13
■ Key Functions............................... 1-14
Using the LCD Display........................ 1-16
Adjusting Screen Brightness ................ 1-16
Choosing the Display Language .......... 1-18
Using the Machine Settings Key .......... 1-19
Using the Machine Operations Key..... 1-20
■ Contents of Other Categories........ 1-22
Using the Pattern Explanation Key....... 1-24
Bobbin Winding/Lower Threading ...... 1-25
■
Winding the Bobbin During Sewing
1-29
Setting the Bobbin............................... 1-31
Upper Threading................................. 1-32
■ Using the Spool Net ..................... 1-37
Pulling Up the Bobbin Thread............. 1-38
Changing the Presser Foot ................... 1-39
■ Removing the Presser Foot ........... 1-39
■ Attaching the Presser Foot ............ 1-39