6-8 Embroidery Edit Functions
1 —
2 —
3 —
4 —
5 —
6 —
7 —
8 —
?
!
9 —
CONTENTS
Index
1
2
3
4
1
2
3
4
Name
Pattern
select key
Rotate key
Delete key
Arrow keys
( Center
key)
Character
spacing key
Size key
Multi color
key
Horizontal mirror
image key
Density key
Array key
Thread
palette key
End key
Explanation
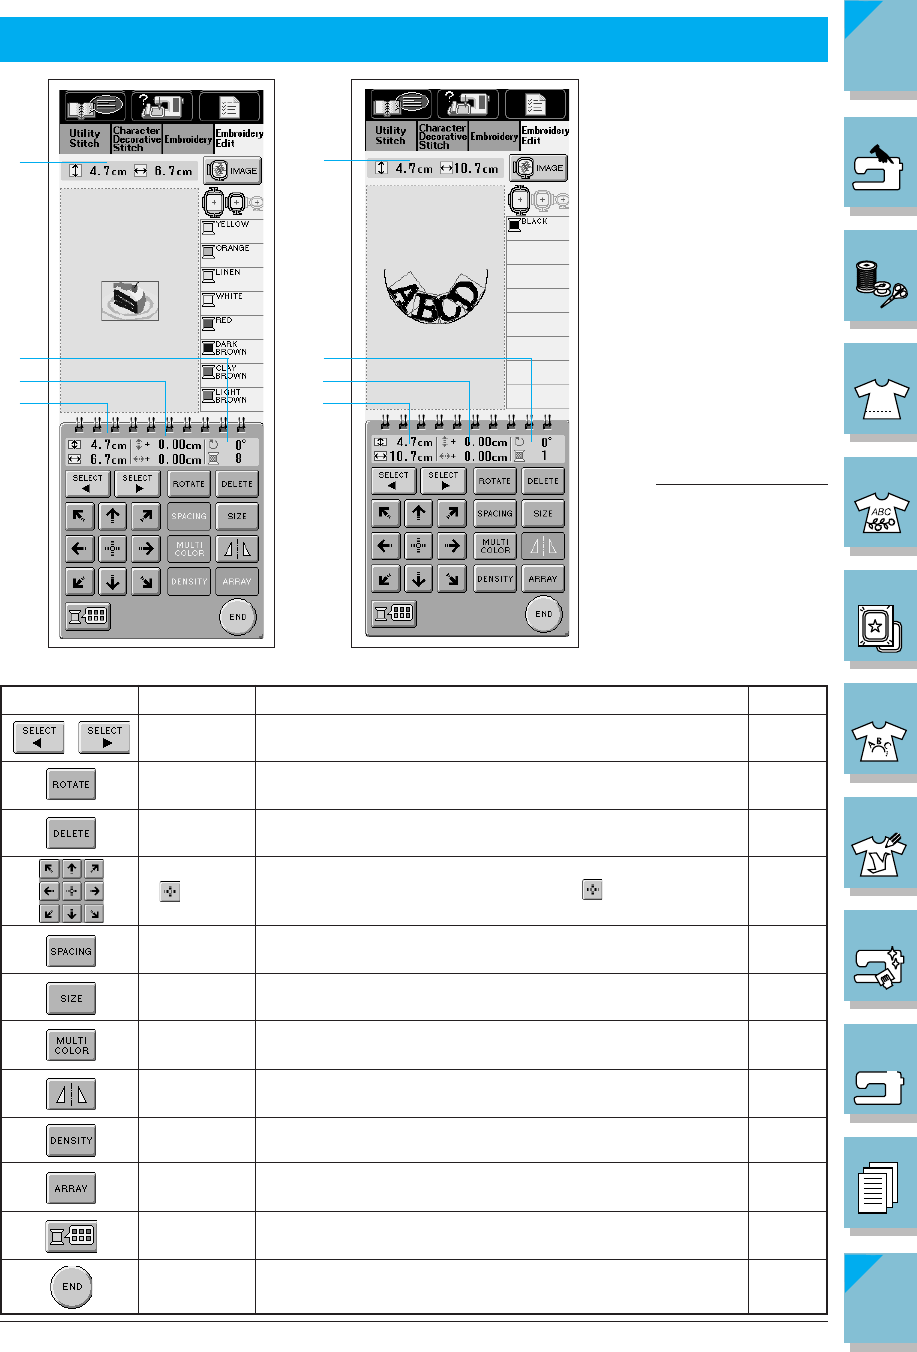
When a combined pattern is selected, use these keys to se-
lect a part of the pattern to edit.
Press this key to rotate the pattern. In the embroidery edit screen,
you can rotate a pattern one degree or ninety degrees at a time.
Press this key to delete the selected pattern (the pattern out-
lined by the red box).
Press these keys to move the pattern in the direction
indicated by the arrow in the key. (Press to return the
pattern to its original position.)
Press this key to change the spacing of character patterns.
Press this key to change the size of the pattern. With the em-
broidery edit functions, patterns can be enlarged or reduced.
Press this key to change the color of individual characters
in a pattern.
Press this key to make a horizontal mirror image of the se-
lected pattern.
Press this key to change the density of frame patterns or char-
acter patterns.
Press this key to change the configuration of a character
pattern.
Press this key to change the colors of the displayed pattern.
Press this key to continue to the next step.
Key or Display
Page
6-26
6-10
6-12
6-9
6-16
6-11
6-17
5-46
5-47
6-15
6-13
6-18
EDITING EMBROIDERY PATTERNS
1 Shows the size of the
entire combined pat-
tern.
2 Shows the size of the
pattern currently se-
lected.
3 If the pattern location
has been moved, this
area shows the distance
from the center of the
frame.
4 Shows the degree of ro-
tation for the pattern.
Shows the color cur-
rently selected , and
number of colors in the
pattern.
Note
If a key display is light gray,
you can not use that func-
tion with the selected pat-
tern.
■ Key Functions


