


CREATING BOBBIN WORK (EMBROIDERY)
How to Create Bobbin Work
Appendix A-15
A
1
k
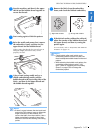
Stop the machine, and then tie the upper
thread and the bobbin thread together to
secure the threads.
l
Start sewing again to finish the pattern.
m
Raise the needle and presser foot, remove
the embroidery frame, and then cut the
upper thread and the bobbin thread.
When cutting the threads, be sure to leave an
adequate length of thread so they can be
properly secured.
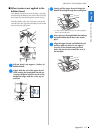
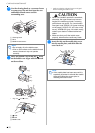
n
Using a hand sewing needle such as a
ribbon embroidering needle, pull the
bobbin thread to the top (wrong side) of the
fabric, and then tie the upper thread and
the bobbin thread together.
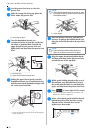
o
Remove the fabric from the embroidery
frame, and check the finished embroidery.
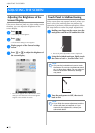
p
If the desired results could not be achieved,
adjust the tension of the bobbin thread and
the upper thread, and then try sewing the
pattern again.
For more details, refer to “ADJUSTING THE THREAD
TENSION” on page A-16.
Memo
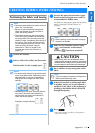
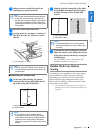
• If there is a gap between the start point and
end point of the pattern, leave an adequate
length of thread, cut the threads, and
remove the fabric from the machine. Use a
ribbon embroidering needle to hand sew
stitches to connect the starting and ending
points.
a Right side of fabric b Wrong side of fabric
Memo
• Check bobbin after each bobbin work
embroidery pattern is sewn to make sure
there is adequate bobbin thread for the next
pattern.
• While selecting the bobbin work pattern, the
embroidery speed value is set to “100
spm”. Refer to “Adjusting the Embroidery
Speed” on page E-33 to change the
embroidery speed.