


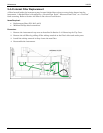

H25-IR Maintenance
Instruction 3015-4342 43
5.3 Flashing Memory
As updates to the instrument’s firmware become available, the instrument can be upgraded by flashing its
memory as described below.
IMPORTANT! After flashing memory, all operating parameters and sensor calibrations will have been
erased. The operator must
have access to the Factory menu in order to set up the following parameters
before placing the instrument back into operation:
- DIGIPOT
- Leak rate of internal leak source
- Leak gas of internal leak source
- Leak temperature of internal leak source
- Leak temperature coefficient of internal leak source
- Pressure sensor calibration
- Flow rate sensor calibration
- Box temperature sensor calibration
Items Required:
• 9-pin-Female to 9-pin-Male Serial Cable (P/N 104-4027)
• Flash Utility Software and Latest Firmware Image File
(downloaded from Website http://www.bacharach-inc.com/downloads.htm)
• Personal computer:
o Running Windows
®
95/98/2000/NT/XP
o Open COM port
Procedure:
1. Connect one end of a 9-pin female to 9-pin male serial cable to the instrument’s rear-panel
RS-232 connector.
2. Connect the other end of the cable to and an open COM port connector on the computer (it may be
necessary to use a 9-pin to 25-pin adapter to make the computer connection).
NOTE: COM1 is the default port used by the Flash Memory Program. If COM1 is already in use by
another device, then connect the instrument to the next available COM port. The software will need
to be reconfigured as described in Step
9 to use this port.
3. With the instrument turned OFF, set DIP switches 1, 2, and 3 located on the instrument’s rear
panel to their UP positions.
4. Turn ON the instrument. Observe that the pump does not start and that the front panel display
does not light.
NOTE: The following steps assume that the operator is familiar with the Windows Operating System,
and is knowledgeable in creating folders, copying files, and navigating the file system using Windows
Explorer. If necessary, refer to the Windows help files for information on performing these operations.
5. Create a folder on the computer’s hard drive named “C:\RFU” (Rabbit Field Utility).
6. Copy the flash utility software and the latest firmware image file (xxx.bin – where “xxx” is the
name and version number of the file) into the folder created in Step
5.