


Installation
11
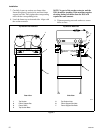
F232122
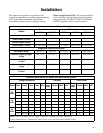
Refer to the Water Saving System (WSS) General
Specifications in this section to determine if there is
adequate clearance through the door for the machine.
If there is not and the WSS needs to be removed, refer
to the section “Removing the Top Section”. If
clearance is sufficient, proceed as follows:
NOTE: Allow concrete to cure before beginning
installation.
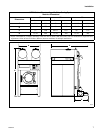
1. Place the WSS next to the concrete foundation.
IMPORTANT: Move the WSS by lifting from the
frame only. Never move by lifting, pulling or
pushing the tanks.
2. Remove the carriage bolts holding the wooden
skid to the WSS frame side legs.
3. Place the WSS over the mounting bolts.
4. Level the frame top section and sides. Align with
the washer-extractor.
NOTE: No part of the washer-extractor and the
WSS should be touching. If the machine requires
elevating during bolt down then the WSS will
require the same amount.
5. Tighten mounting nuts and washers to secure
frame to floor.
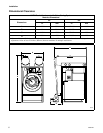
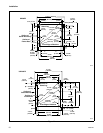
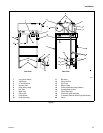
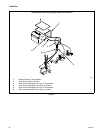
Removing Top Section
If removing the top section is necessary due to
insufficient clearance, refer to Figure 3 and proceed as
follows:
1. Place the WSS next to the concrete foundation.
IMPORTANT: Move WSS by lifting from the
frame only. Never move by lifting, pulling or
pushing the tanks.
2. Secure top section with lifting equipment.
3. Remove the eight nuts and bolts from the top
section that fasten the frame sides to the top
section. Refer to Figure 3.
4. Secure both frame sides in place and lift top
section with lifting equipment.
5. Remove the frame sides from the wooden skid by
removing the carriage bolts holding them to the
skid. Remove frame support bar. Refer to Figure 3.
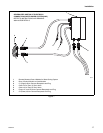
6. Place both frame sides over the mounting bolts
and replace frame support bar. Snugly screw down
the mounting nuts. Do not tighten nuts at this time.