


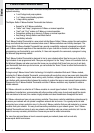
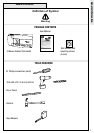

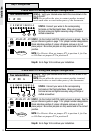

7
B
G
W
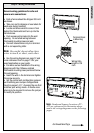
Wrap wires around
pencil to prevent
wires from falling
into wall opening.
1. Switch electricity to the furnace and air
conditioner OFF by disconnecting the power
supply at the circuit breaker or at each unit.
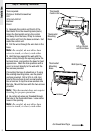
2. Remove cover from the existing thermostat.
Most are snap-on types and simply pull off.
Some have locking screws on the side or front
and require the screws to be loosened before
removal.
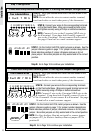
3. Note the letters printed near the terminals.
ATTACH LABELS (enclosed) to each wire for
identification.
Note: It is very important to label all
wires before disconnecting them.
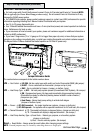
4. Label the wires one at a time. You must
label all the wires before you proceed. With all
wires labeled, remove them from the existing
thermostat. Do not let the wires fall back inside
the wall. Wrapping them around a pencil, as
shown, will keep them from falling.
5. Loosen all screws on the existing thermostat
and its mounting plate and remove it from the
wall. Be careful not to disturb wiring labels.
6. (Optional) Fill wall opening with
non-combustible insulation to prevent drafts.
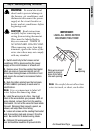
WARNING: To avoid electrical
shock and to prevent damage to
the furnace, air conditioner, and
thermostat disconnect the power
supply at the circuit breaker or
heater and air conditioner before
beginning work.
CAUTION: Read instructions
carefully before removing any
wiring from existing thermostat.
Wires must be labeled before
they are removed. THERE IS
NO STANDARD COLOR CODE.
When removing wires from their
terminals, ignore the color of the
wires since these may not comply
with any standard.
Step 2: Removing Existing Thermostat
Installation
IMPORTANT:
LABEL ALL WIRES BEFORE
DISCONNECTING THEM!
Continued Next Page
Note: Be careful, do not allow bare
wires to touch, or short, each other.
Wall
Opening