


19
Installation
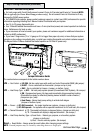
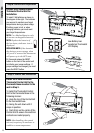
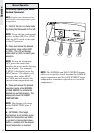
Step 10: Installation Verification
Verify you have correctly installed the
Z-Wave
® Enabled Thermostat:
1. Restore Power: Turn on all electrical power
turned off in Step 1.
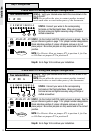
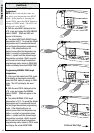
2. Check Fan:
NOTE: Do this only if during installation
the G wire or the fan relay was connected,
otherwise proceed to 3.
A. Slide fan switch to the ON position.
B. Verify air is blowing from your system.
C. Return to AUTO position for Normal operation.
3. Check Heat:
A. Press and release the HEAT button on the
front of the control unit. The word HEAT will
appear in the display.
B. Press the “+” symbol (Temperature up) button
to raise the temperature to 90 degrees F.
C. Wait 5 minutes, then verify warm air is
blowing from your system.
D. Press and release the HEAT button to shut off
the heat.
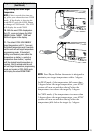
4. Check Air Conditioning:
NOTE: Wait 5 minutes after doing the Heat
Check, before proceeding.
A. Press and release the COOL button on the
front of the control unit. The word COOL will
appear in the display.
B. Press the “-”symbol (Temperature down)
button to lower the temperature 5 degrees less
than the current reading.
C. Wait 5 minutes, then verify cool air is blowing
from your system.
D. Press and release the COOL button to shut off
the cooling system.
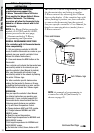
NOTE: If any of these checks do not function
properly, review your wiring and jumper
conguration. If the problem persists,
contact customer support for assistance.
Installation of your Wayne-Dalton Z-Wave®
Enabled Thermostat is complete. Go to
Page 21 for Operation and Programming
information.
AUTO
ON
FAN
HEAT
COOL
SAVE
ENERGY
NORMAL
RESET
COOL
2A
2C
3A
3D
4A
4D
4B
3B