


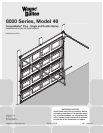

6
Please Do Not Return This Product To The Store. Contact your local Wayne-Dalton dealer. To find your local Wayne-Dalton dealer, refer to your
local yellow pages/business listings or go to the Find a Dealer section online at www.wayne-dalton.com
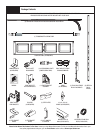
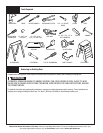
Tools Needed:
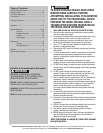
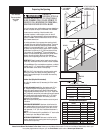
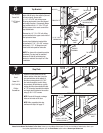
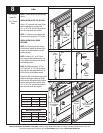
HEADROOM REQUIREMENT
DOOR
HEIGHT
TRACK
MANUAL
LIFT
MOTOR
OPERATED
6’5” 10”, 12”, 14” Radius 89” 125”
6’5” Low Headroom 101” 125”
6’6” 10”, 12”, 14” Radius 90” 125”
6’6” Low Headroom 102” 125”
7’0” 10”, 12”, 14” Radius 96” 125”
7’0” Low Headroom 108” 125”
7’6” 10”, 12”, 14” Radius 102” 137”
7’6” Low Headroom 114” 137”
8’0” 10”, 12”, 14” Radius 108” 137”
8’0” Low Headroom 120” 137”
BACKROOM REQUIREMENT
TRACK TYPE TorqueMaster
®
Plus
10”, 12” 10”
14” 12”
3-1/2” LHR 6”
LHR Kit 6 1/2”
Recommended
tools from
page 5
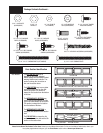
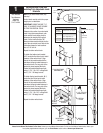
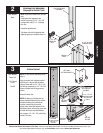
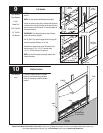
Preparing the Opening
WEATHER SEAL
HEADROOM
BACKROOM
DOOR
WIDTH
DOOR HEIGHT
LEVEL HEADER
PLUMB JAMBS
HEADER BOARD
2” X 6” LUMBER
PREFERRED
SUITABLE MOUNTING
SURFACE 2” X 6”
LUMBER MINIMUM
HEADER
JAMB
JAMB
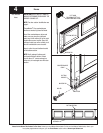
FAILURE TO
SECURELY ATTACH A
SUITABLE MOUNTING PAD TO STRUCTURALLY
SOUND FRAMING COULD CAUSE SPRINGS TO
VIOLENTLY PULL MOUNTING PAD FROM WALL,
RESULTING IN SEVERE OR FATAL INJURY.
If you just removed your existing door or you are installing a
new door, complete all steps in PREPARING THE OPENING.
To ensure secure mounting of track brackets, side
and center brackets, or steel angles to new or retro-fit
construction, it is recommended to follow the procedures
outlined in DASMA Technical Data Sheets #156, #161 and
#164 at www.dasma.com.
The inside perimeter of your garage door opening should
be framed with wood jamb and header material. The jambs
and header must be securely fastened to sound framing
members. It is recommended that 2” x 6” lumber be used.
The jambs must be plumb and the header level. The jambs
should extend a minimum of 12” (305 mm) above the top
of the opening for TorqueMaster
®
Plus counterbalance
systems. For low headroom applications, the jambs should
extend to the ceiling height. Minimum side clearance
required, from the opening to the wall, is 3-1/2” (89 mm).
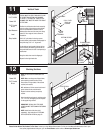
IMPORTANT: Closely inspect jambs, header and mounting
surface. Any wood found not to be sound, must be replaced.
For TorqueMaster
®
Plus counterbalance systems, a suitable
mounting pad (2” x 4”) must be firmly attached to the wall,
above the header at the center of the opening.
NOTE: Drill 3/16” pilot holes in the mounting pad to avoid
splitting the lumber, and attach mounting pad with lag
screws of appropriate length. Do not attach the mounting
pad with nails.
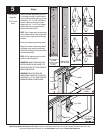
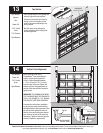
Weather Seal (May Not Be Included):
Cut or trim the weather seal (if necessary) to fit the header
and jambs.
For fully adjustable track: Align the header seal 1/8” to
1/4” inside the header and temporarily secure it to the
header with equally spaced nails. Next, fit the jamb seals
up tight against the header seal and 1/8” to 1/4” inside the
jamb. Temporarily secure the jamb seals with equally spaced
nails. Equally space nails approximately 12” to 18” apart.
This will keep the bottom section from falling out of the
opening during installation.
NOTE: Do not permanently attach weather seal to the jamb
at this time.
HEADROOM REQUIREMENT: Headroom is defined as the
space needed above the top of the door for tracks, springs,
etc. to allow the door to open properly. If the door is to be
motor operated, 2-1/2” (64 mm) of additional headroom is
required.
NOTE: 6” LHR Conversion Kit is available for 12” track radius
only. Contact your local Wayne-Dalton dealer.
BACKROOM REQUIREMENT: Backroom is defined as the
distance needed from the opening back into the garage to
allow the door to open fully.
WARNING
JAMB
WEATHER
SEAL
1/8” TO 1/4”