


5
Please Do Not Return This Product To The Store. Contact your local Wayne-Dalton dealer. To find your local Wayne-Dalton dealer, refer to your
local yellow pages/business listings or go to the Find a Dealer section online at www.wayne-dalton.com
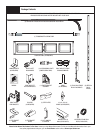
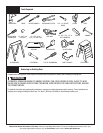
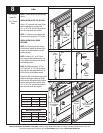
Tools Required
SAFETY GLASSESFLAT TIP SCREWDRIVER
1/4”, 3/8”, 7/16”, 1/2” &
9/16” WRENCHES
1/2”, 9/16”, 5/8”
& SOCKET
PHILLIPS HEAD
SCREWDRIVER
PLIERS/WIRE CUTTERSRATCHET WRENCHPOWER DRILL
(2) SAWHORSES
GLOVES7/16”, 1/2” SOCKET
DRIVER
HAMMER
VICE GRIPS
STEP LADDER
TAPE MEASURE
LEVEL
(2) VICE CLAMPS
PENCIL
1/8”, 3/16”, 9/32”,
5/16”, 1/2” DRILL BITS
3” EXTENSION
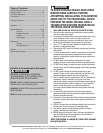
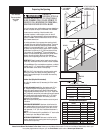
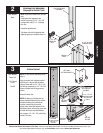
Counterbalance spring tension must always be released before any attempt is made to start removing an existing door.
A POWERFUL SPRING RELEASING ITS ENERGY SUDDENLY CAN CAUSE SEVERE OR FATAL INJURY. TO AVOID
INJURY HAVE A TRAINED DOOR SYSTEMS TECHNICIAN, USING PROPER TOOLS AND INSTRUCTIONS, RELEASE
THE SPRING TENSION.
For detailed information see supplemental instructions “removing an existing door/preparing the opening”. These instructions are
available at no charge from Wayne-Dalton Corp., P.O. Box 67, Mt. Hope, OH 44660, or at www.wayne-dalton.com.
HACKSAW
Removing an Existing Door
WARNING
TORX BIT