


34
• Visually inspect the 4 heat exchanger tubes for excessive carbon (soot) build-up. Refer
to heat exchanger section of the manual.
5. Oil Filter – Replace the supply line oil filter cartridge with a new filter of the same type and
rating. Clean the body of, or mounting plate for, the oil filter.
6. Labels and Markings - Clean all appliance labels, markings, and instruction plates, as
necessary, and verify that all are still legible. Any illegible or missing markings must be
replaced. Replacements can be obtained by contacting Thermo Products.
B. HEAT EXCHANGER: CLEANING INSTRUCTIONS
WARNING: A qualified heating contractor must clean the heat exchanger.
At least once a year, inspect the heat exchanger for evidence of corrosion, pitting, warpage, deterioration,
and carbon (soot) build-up. A layer of soot on the inside of the heat exchanger will act as an insulator and
reduce heat transfer, resulting in less heating efficiency.
Also, look for loose or deteriorated gaskets and insulation around the vent pipe, the burner, and
accessible areas of the heat exchanger. If this inspection indicates heat exchanger cleaning is necessary,
follow the heat exchanger cleaning instructions below.
WARNING: THE HEAT EXCHANGER MUST BE CLEANED BY A QUALIFIED SERVICE PERSON.
It is important to inspect and clean the heat exchanger once a year, or as necessary, to remove any build-
up of soot. A layer of soot on the inside of the heat exchanger will act as an insulator and reduce heat
transfer, resulting in less efficiency.
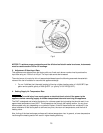
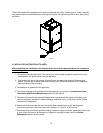
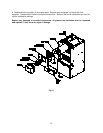
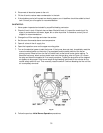
1. To clean the heat exchanger, first turn off all power to the unit. Remove the vent connector, the
burner, and the burner mounting plates. Then place the heat exchanger cleaning shelf on the 3 bottom
bolts as pictured. (See figure 11).
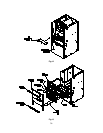
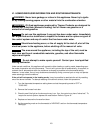
2. With access to the inside of the heat exchanger through the burner area, it is possible to use a long,
flexible wire brush and an industrial type vacuum cleaner to remove any soot build-up. NOTE: A one inch
(outside diameter) vacuum cleaner hose will fit into the tubes.
To vacuum and brush the tubes of the heat exchanger, go through the front openings in both directions,
as shown in figure 12 on the next page.
3 Remove front cover of heat recovery coil by removing all of the mounting screws. Then carefully pry
the cover loose taking care not to bend the cover. Remove a couple of turbulators to give visual
inspection of both the tube and tabulator. If excess build-up of soot is found, the secondary coil will need
thoroughly cleaned.
4. The entire heat exchanger can be removed from the front by removing the separator. Next remove
both side block-off baffles. Then disconnect the drain hose. The heat exchanger will now be able to be
pulled straight out of the furnace with the aid of the two back support wheels.
5. The rear coil cover should now be removed as done in #3. Next remove all turbulators. The
secondary can now be thoroughly brushed and cleaned.