16
Temco DV1000/1200/1400 Series
76657
tion and building materials. An attic insulation shield
(AS7-8) may be used above the firestop to keep attic
insulation spaced away from the vent system.
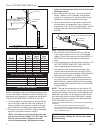
8. Rigid pipe section included with vertical termination
must be used in conjunction with the roof support so
that the termination is secure in winds. All vent kit
components can be assembled on the ground first,
then lift complete assembly onto the roof and feed
flex vent down thru the roof opening and firestop
thimble assembly. Then trim off unneeded flex at unit
and make the connection at the fireplace flue and in-
let collars. Make sure vent cap will be in accordance
with the vertical termination location chart. Install the
roof flashing below the shingles across the top half,
and above the shingles on the lower half.
9. Install storm collar and caulk around the pipe.
TDV Series Direct Vent System Installation
• The TDV series vent system is specifically approved
only for Temco Direct-Vent fireplace models with a 4”
(102 mm) diameter flue and a 7” (178 mm) diameter
inlet vent system. The use of uncertified venting will
void warranties and may compromise the operation
and safety of the appliance.
• Termination shall not be recessed into a wall or sid
-
ing.
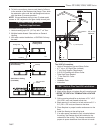
• The vent system shall be properly supported so
there are no sags in the system. Supports must be
used at least every 3’ (914mm) on horizontal section
and every 6’ (1.8m) on vertical.
• Horizontal sections must maintain a minimum 1/4”
rise per linear foot of horizontal run.
• Combustible clearances from any horizontal vent
pipe area must be 2” (51mm) from top of vent, and
1” (25mm) from sides and bottom.
• Clearance to combustibles from vertical pipe surface
is 1” (25mm).
• Prior to securing each vent component, make sure
the sections are pushed together firmly to maintain
vent integrity.
Sidewall (Horizontal) Venting, General
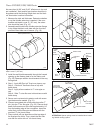
When locating the vent termination, the minimum vent
clearances must be observed.
NOTE: Local codes may require different clearances.
It is recommended that the temination not be located
within 24” (610 mm) of garden sheds, fences, decks,
utility buildings or other obstructions.
Review the “vent termination” section in the appliance
installation instructions.
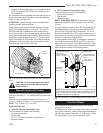
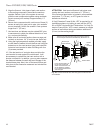
Do not locate vent terminal where excessive snow or
ice build up may occur. Be sure to check vent termina-
tion area after snow falls and clear to prevent accidental
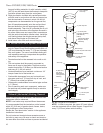
1" (25mm)
Minimum
T192
vertical cap
12/5/03 djt
VT47 Vertical
Vent Cap
4” (102 mm) Dia.
7” (178 mm) Dia.
Vent Pipe Assembly
(VSK7MH-S)
(VSK7)
Vent System Roof
Support / Clamp
Assembly
Band Clamp
4” (102 mm) Dia. Flex Flue
Band Clamp
7” (178 mm) Dia.
Flex Vent
Vent Cap
8: (203 mm)
Dia. Pipe
Must Extend
Through Roof
Flashing
Roof Flashing
Roof
Exterior
Storm Collar
Roof Support
Assembly
7” (178 mm) Dia.
Flex Vent
Clearance to Combustibles
T192
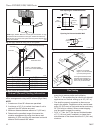
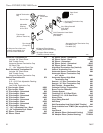
Fig. 26 Through the roof installation.
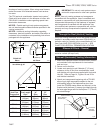
NOTE: If offset is required, the upper 45° bend (elbow)
must be supported with an offset support. Support flex
every 3’ (914 mm) when vertical venting.


