


User Manual Chapter 7 Measuring Features and Defects 103
To Take a Shadow Measurement
1. Attach the shadow tip securely, and verify it.
See “Verifying Measurement Tips” on page 108.
2. Position the probe tip for maximum accuracy.
See “To Position the Probe Tip for a Shadow Measurement Image” on page 101.
3. Freeze the image.
4. Select the measurement type and tip.
Press . Select Measure > Shadow > measurement type > tip.
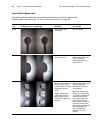
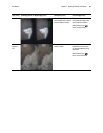
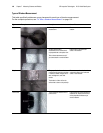
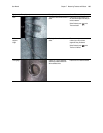
5. If a vertical dashed line (called the shadow line) appears, center it over the shadow.
Measurement accuracy depends on centering this line accurately.
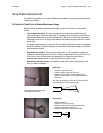
6. Place the cursors.
Measurement accuracy depends on all cursors being positioned accurately. For best
accuracy in cursor placement, press to activate the zoom window for a close-up
view of the image around the active cursor.
To learn how to place cursors for specific measurement types, see “Types of Shadow
Measurement” on page 104.
7. (Optional) Reposition the cursors and the measurement result.
8. (Optional) Perform any of these tasks:
9. Save the image.
Press . For details, see “Saving an Image” on page 61.
Task Menu Item
Add measurements, up to five total. Press . Select Measure > Add.
Clear some or all measurements. Press . Select Measure > Clear measurement.
Select the correct tip in the software (if the selected
tip is not the one that you are using).
Press . Select Measure > Tip.
Adjust the shadow line’s position. Press . Select Measure > Move Shadow Line.
(Shortcut: Hold .)