


26
GB
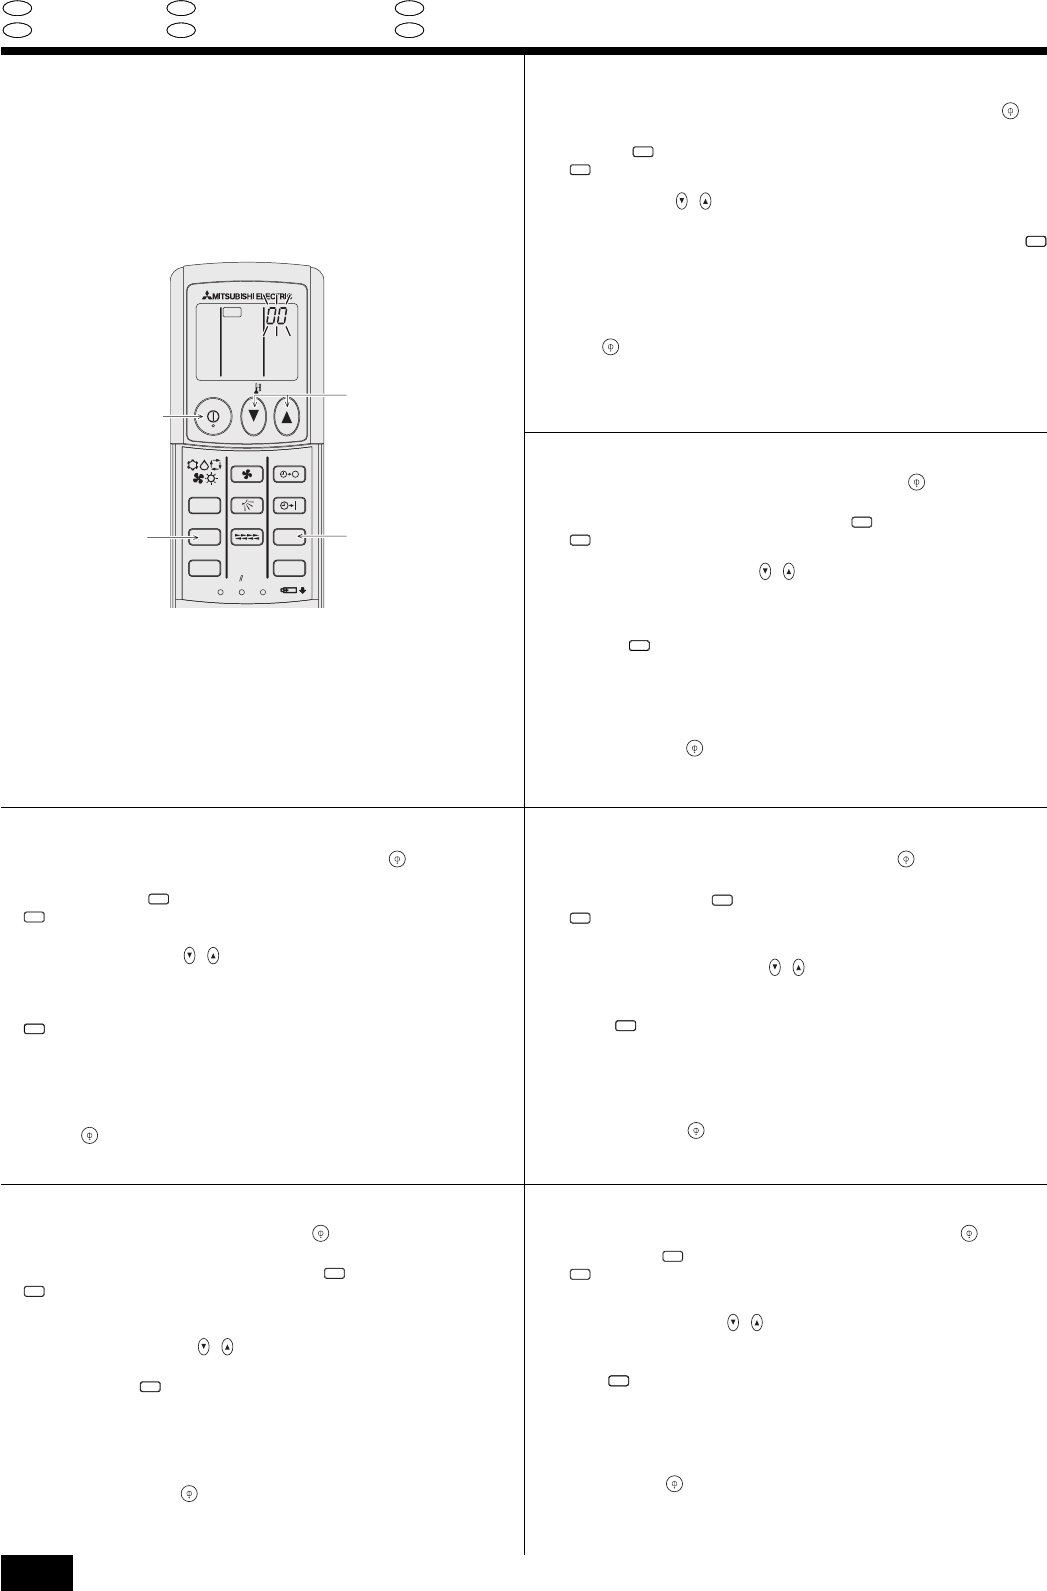
6. Self Check
D
6. Selbsttest
F
6. Auto-Contrôle
E
6. Autocomprobación
I
6. Autodiagnosi
NL
6. Zelftest
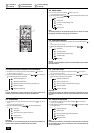
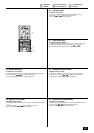
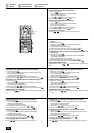
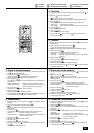
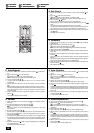
CLOCK
CHECK
RESET
SET
TEST RUN
MODE
FAN
VANE
LOUVER
min
h
AUTO START
AUTO STOP
CHECK
ON/OFF
TEMP
2
15
4
3
6. Self Check
1 Stop the air conditioner using the wireless remote controller ON/OFF but-
ton.
2 Press the
CHECK
button twice continuously.
•
CHECK
begins to light and address display, “00” begins to blink.
• Start this operation from the status of remote controller display turned off.
3 Press the TEMP
, buttons.
• Set the address of the indoor unit that is to be self-diagnosed.
4 While pointing the remote controller toward the signal receiver, press the
h
button.
• The operation cannot be performed when the unit is in trouble.
• The check code will be indicated by the number of times that the buzzer sounds
from the receiver section and the number of blinks of the operation lamp.
5 While pointing the remote controller toward the unit’s receiver, press the ON/
OFF
button.
• Self-check mode is canceled.
6. Auto-Contrôle
1 Arrêtez le climatiseur à l’aide de la touche ON/OFF de la télécommande
sans fil.
2 Appuyez sur la touche
CHECK
deux fois de suite.
•
CHECK
s’allume sur l’affichage, “00” se met à clignoter.
• Lancez ce mode de fonctionnement à partir du statut d’affichage de la télé-
commande éteinte.
3 Appuyez sur les touches TEMP
, .
• Réglez l’adresse de l’appareil intérieur qui doit subir un auto-contrôle.
4 Tout en pointant la télécommande vers le récepteur de signaux, appuyez sur la
touche
h
.
•
L’opération ne pourra pas être exécuté si l’appareil présente un dysfonctionnement.
• Le code de contrôle sera indiqué par le nombre de fois que l’avertisseur sonore
retentit à partir du récepteur et le nombre de clignotements du témoin de fonc-
tionnement.
5 Tout en pointant la télécommande vers le récepteur de l’appareil, appuyez sur
la touche ON/OFF
.
• Le mode d’auto-contrôle est annulé.
6. Zelftest
1 Zet de airconditioner uit met de ON/OFF-knop van de draadloze afstands-
bediening.
2 Druk tweemaal gedurende enige tijd op de knop
CHECK
.
•
CHECK
licht op in het display en “00” begint te knipperen.
• Zorg dat het display van de afstandsbediening uit staat wanneer u deze actie
gaat uitvoeren.
3 Druk op de TEMP-knoppen
, .
• Stel het adres in van het binnenapparaat waarmee u de zelftest wilt uitvoeren.
4 Druk op de knop
h
terwijl u met de afstandsbediening naar de signaal-
ontvangsteenheid wijst.
• Deze actie kan niet uitgevoerd worden als er problemen met het apparaat zijn.
• De controlecode wordt aangegeven door het aantal zoemergeluiden dat de
signaalontvangsteenheid maakt en door het aantal keren dat de werkingslamp
knippert.
5 Druk op de ON/OFF-knop
terwijl u met de afstandsbediening naar de signaal-
ontvangsteenheid wijst.
• De zelfteststand wordt geannuleerd.
6. Selbsttest
1 Stoppen Sie die Klimaanlage mit der Taste ON/OFF auf der drahtlosen
Fernbedienung.
2 Drücken Sie zweimal nacheinander die Taste
CHECK
.
•
CHECK
leuchtet auf und das Adreßdisplay “00” blinkt.
• Starten Sie diesen Vorgang bei abgeschaltetem Fernbedienungs-Display.
3 Drücken Sie die Tasten TEMP
, .
• Stellen Sie die Adresse derjenigen Innenanlage ein, die einen Selbsttest durch-
führen soll.
4 Zeigen Sie mit der Fernbedienung auf den Signalempfänger, und drücken Sie
die Taste
h
.
• Dieser Vorgang kann nur durchgeführt werden, wenn das Anlage störungsfrei
arbeitet.
• Der Prüfkode wird angezeigt durch die Anzahl der Signaltöne der Empfänger-
einheit und die Anzahl der Blinksignale der Betriebslampe.
5 Zeigen Sie mit der Fernbedienung auf den Signalempfänger, und drücken Sie
die Taste ON/OFF
.
• Der Selbsttest wird beendet.
6. Autocomprobación
1 Detenga el acondicionador de aire utilizando el botón ON/OFF .
2 Pulse el botón
CHECK
dos veces sucesivamente.
•
CHECK
se enciende y el indicador de dirección, “00” comienza a parpadear.
• Inicie esta operación con el estado del indicador del controlador remoto
desactivado.
3 Pulse los botones TEMP
, .
• Ajuste la dirección de la unidad interior que será autodiagnosticada.
4 Mientras apunta el controlador remoto hacia el receptor de la señal, pulse el
botón
h
.
• No puede llevarse a cabo esta operación cuando la unidad tiene un problema.
• Se indicará el código de comprobación mediante el número de veces que sue-
na el timbre desde la sección de recepción y el número de parpadeos de la luz
de funcionamiento.
5 Mientras apunta el controlador remoto hacia el receptor de la señal, pulse el
botón ON/OFF
.
• Se cancela el modo de autocomprobación.
6. Autodiagnosi
1 Disattivare il climatizzatore utilizzando il pulsante ON/OFF sul telecoman-
do.
2 Premere il pulsante
CHECK
due volte di seguito.
•
CHECK
si illumina sul display e “00” inizia a lampeggiare.
• Iniziare l’operazione con il display del telecomando spento.
3 Premere i pulsanti TEMP
, .
• Impostare l’identificazione dell’unità interna su cui si intende eseguire
l’autodiagnosi.
4 Puntare il telecomando verso il ricevitore del segnale e premere il pulsante
h
.
• Non è possibile eseguire l’operazione quando l’unità presenta dei problemi.
• Il codice del risultato della diagnosi è indicato dal numero di volte che il ricevi-
tore emette il segnale acustico e dal numero di volte che la spia di funziona-
mento lampeggia.
5 Puntare il telecomando verso il ricevitore del segnale e premere il pulsante
ON/OFF
.
• La modalità autodiagnosi verrà annullata.
GB
6. Self Check
D
6. Selbsttest
F
6. Auto-Contrôle
E
6. Autocomprobación
I
6. Autodiagnosi
NL
6. Zelftest