


Installation & Operation Manual
22
2 Venting
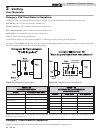
CAT I, II, & IV General venting information- Vent options: All Categories
Vent installation for connection to gas vents or chimneys must be in accordance with “Venting of Equipment”, of the latest edition
of the National Fuel Gas Code, ANSI Z223.1, in Canada, the latest edition of CAN/CGA Standard B149 Installation Code for Gas
Burning Appliances and Equipment or applicable provisions of the local building codes.
All venting applications where combustion air is drawn from the equipment room must have adequate combustion and ventilation
air supplied to the equipment room in accordance with the latest edition of CAN/CGA Standard B149 Installation Code for Gas
Burning Appliances and Equipment or applicable provisions of the local building codes.
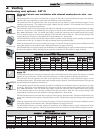
The distance of the vent terminal from adjacent buildings, windows that open and building openings MUST comply with the
minimum clearances stated in this manual and the latest edition of the National Fuel Gas Code, ANSI Z223.1, in Canada, the latest
edition of CAN/CGA Standard B149 Installation Code for Gas Burning Appliances and Equipment.
The vent connection is made directly to the flue outlet opening on the rear of the unit. The connection from the appliance vent to
the stack must be made as direct as possible with no reduction in diameter.
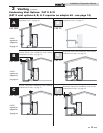
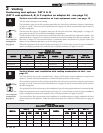
CAT IV Specific venting information: Vent Options A, B, C, D, E, & F
A Category IV venting system operates with a positive pressure in the vent. This positive pressure is generated by the internal
combustion air blower which operates the combustion process and also exhausts the flue products from the building. The Category
IV flue from this appliance cannot be combined with the vent from any other appliance. The Category IV flue from this appliance
must be a dedicated stack, there is one exception however. The Category IV flues from multiple Power-fin appliances may only
be combined when using an engineered vent system incorporating an induced draft fan to ensure that flue products will be
properly exhausted from the building at all times. Failure to use a properly sized induced draft fan on a combined Category IV
vent installation may result in a hazardous condition where flue gases spill into an occupied living space. Consult the induced
draft fan manufacturer to size the induced draft fan and to determine the diameter of the common vent pipe required for a
combined vent installation. The flue from this Category IV appliance must have all vent joints and seams sealed gastight. A
Category IV vent system has specific vent material and installation requirements.
The flue products in the vent system may be cooled below their dew point and form condensate in the flue. The flue materials used
for a Category IV vent must be resistant to any corrosive damage from flue gas condensate. The flue from a Category IV vent system
must have a condensate drain with provisions to properly collect and dispose of any condensate that may occur in the venting
system.
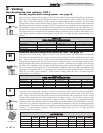
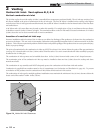
The connection from the appliance vent to the stack or vent termination outside the building must be made with listed Category
IV vent material and must be as direct as possible. The Category IV vent and accessories such as firestop spacers, thimbles,
caps, etc., must be installed in accordance with the vent manufacturer’s instructions. The vent connector and firestop must provide
correct spacing to combustible surfaces and seal to the vent connector on the upper and lower sides of each floor or ceiling through
which the vent connector passes.
Any vent materials specified must be listed by a nationally recognized test agency for use as a Category IV vent material.
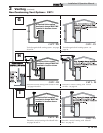
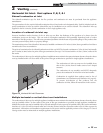
The venting system must be planned so as to avoid possible contact with concealed plumbing or electrical wiring inside walls, floors,
or ceilings. Locate the appliance as close as possible to a chimney or gas vent.
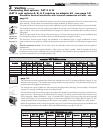
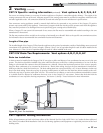
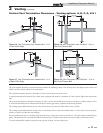
Horizontal portions of the venting system shall be supported to prevent sagging. Horizontal runs should slope upwards not less
than a 1/4 inch per foot from the drain tee installed in the flue to the vertical portion of the flue or to the vent terminal on sidewall
venting installations. This ensures proper removal of any condensate that may form in the flue. Follow the installation instructions
from the vent material manufacturer.
NOTICE
Examine the venting system at least once a year. Check all joints and vent pipe connections for tightness. Also
check for corrosion or deterioration. Immediately correct any problems observed in the venting system.