


HA40 4-Channel Controller
Revision 1 (07/08)
HA40 Technical Manual 2-6
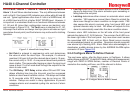
2�2�5 Cal Setup Menu
The CAL SETUP feature supports pushbutton calibration of zero
and span values. This feature should only be utilized when there are
no other zero/span controls within the monitoring system since it is
inappropriate to calibrate a signal at more than one point. Therefore,
if calibration will be performed at another transmitter or monitoring
device, the CAL SETUP feature should not be used.
The CAL SETUP menu allows entering the correct Zero Gas & Span
Gas set-point values needed to calibrate the channel. These are
entered in the same engineering units as input range.
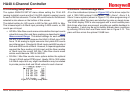
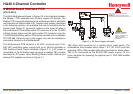
Figure 2-5. Cal Setup Menu
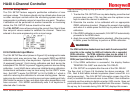
2�2�6 Calibrate Input Menu
The CAL SETUP ow chart (shown in Figure 2-6) is designed to make
calibration quick, easy and error free. A successful ZERO and SPAN
calibration requires only a few keystrokes. Optional 4-20mA outputs
(if equipped) transmit 1.5mA during calibration and 4mA during the
subsequent CAL DELAY to prevent triggering external alarms during
calibration. Local HA40 alarm relays are inhibited during calibration.
Unintentional calibrations may be reset using the Set UNITY menu
item. Set UNITY resets Cal OFFSET to 0 & Cal GAIN to 1 which is
useful for returning the calibration to a known starting place. Sensor
aging may be monitored by recording zero and span readings at Unity
Gain when the sensor is new, and again later when degradation may
have occurred. CAL MODE automatically exits if no keystroke is
detected after 5 minutes.
Use the following step-by-step procedure to perform ZERO and SPAN
calibrations.
To enter the CAL SETUP from any data display, press the dual 1.
purpose down arrow / CAL key then use the up/down arrow
keys to select the channel to calibrate.
Stimulate the monitor to be calibrated with an appropriate 2.
ZERO calibration standard. Observe the screen’s live reading
and when it is stable press the Edit key to perform the ZERO
calibration.
If the ZERO calibration is successful, CAL SETUP automatically 3.
proceeds to the SPAN check.
Apply the correct SPAN calibration standard. After the reading 4.
is stable, press the Edit key to perform a SPAN calibration.
Warning
TheSPANcalibrationstandardusedmustmatchthevaluespecied
since this is the reading the HA40 will indicate after a successful
SPAN calibration. The SPAN calibration value may be edited if it
becomes necessary to apply a different calibration standard to set
SPAN (see Span Calibration in section 2.2.5).
If the SPAN calibration is successful, the display flashes 5.
“REMOVE CAL GAS” and starts the CAL DELAY.
CAL SETUP is complete after the end of the CAL DELAY.6.
The ow chart in Figure 2-6 illustrates the above procedure. UP,
CAL, Next & Edit labels indicate keystrokes (down arrow/CAL is a
dual purpose key). The CAL SETUP information screen (top of the
chart) is available for advanced users to see Offset / Gain calibration
constants and live analog to digital converter (A/D) counts. Span set
point calibration values may also be edited from this screen. Holding
the up key, for 5 seconds during CAL SETUP, displays this screen.