


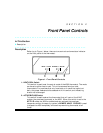

4500 Thermostat Installation Instructions
3-2
While installation of the 4500 is possible without the services of a HVAC
contractor, some installers will prefer to have an HVAC contractor connect
the 4500 to the HVAC system and test its operation. This is recommended if
you do not have HVAC experience. In cases where you prefer to do the entire
installation, it is suggested that the HVAC contractor be contacted for
information on the type of heating system and the amount of “span” (i.e.
temperature swing) that should be set with the 4286 phone module.
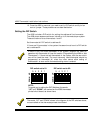
Mounting and Installation
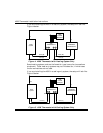
The 4500 thermostat is designed to be mounted alongside the existing
thermostat. Once the 4500 is mounted, the wiring connections can be made.
The wires to the existing thermostat will have to be disconnected, and then
re-connected with the 4500 as shown in Figure 3.
Refer to the Wiring Connections section below to understand how the 4500
and existing thermostat are connected.
Wiring Connections
Before you can understand how the 4500 is connected, you should first
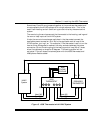
understand how the existing thermostat and HVAC system is connected.
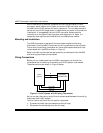
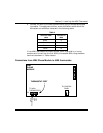
These connections are shown in Figure 2 below:
PREMISES
THERMOSTAT
HVAC
System
R
Rc
Heat (W)
Cool (Y)
Fan (G)
W
Y
G
Figure 2. HVAC System with Existing Thermostat
As you can see, there are a total of five wires connected between the existing
thermostat and HVAC system.
The first two wires, R and Rc, are used for loop power.
• R powers the heat loop (and sometimes the fan loop).
• Rc powers the cooling loop (and the fan loop).