


Section 3. Installing the 4500 Thermostat
3-5
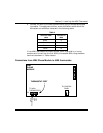
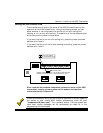
When installing the 4500 thermostat, refer to the Summary of Connections at
the back of this manual. This diagram depicts the 4500's terminal strip and
shows exactly how the thermostat must be wired.
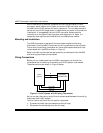
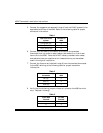
The heating/cooling system and thermostat you are working on may not have
all the connections shown.
All heating systems have R and W connections. Heating systems with a fan
control have the G connection.
Air conditioning systems have Rc and Y connections as well as a G connection
for the fan.
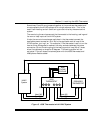
Combination heat and air conditioning systems usually will have all connections
shown. Sometimes R and Rc are common, and are jumpered together at the
premises thermostat. This is the case if both heating and air conditioning are
controlled by the same control system.
Step-by-Step Installation Instructions
To install the 4500 thermostat, follow the procedure below:
1.
As should be done when working on any electrical equipment, remove
primary power to the system to prevent damage to the equipment.
2.
Open the front panel of the 4500 so that you can access its terminal strip.
3.
Mount the 4500 as near to the premises thermostat as possible.
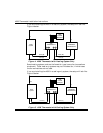
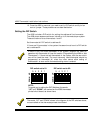
4.
Make a note of the terminal number that the Y(ellow), G(reen), and
W(hite) wires are connected to on the existing thermostat. You will need
to connect new wires to these terminals later. Tag and disconnect those
wires from the premises thermostat as follows:
•
White (W) Heat connection
•
Yellow (Y) Cool connection
•
Green (G) Fan connection
These three wires removed come from the HVAC system (refer to Figure 2)
and will be connected to the new 4500 thermostat. It may be necessary to
splice these wires in order to reach the terminals of the 4500.