


Heat & Glo • RED40, RED40ST • 2155-900 Rev. o • 7/1260
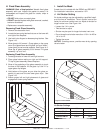
Figure 14.4 Air Shutter
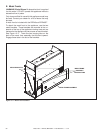
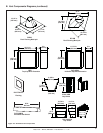
Figure 14.3 Fixed Glass Assembly
H. Fixed Glass Assembly
WARNING! Risk of Asphyxiation! Handle fi xed glass
assembly with care. Inspect the gasket to ensure it is
undamaged and inspect the glass for cracks, chips or
scratches.
• DO NOT strike, slam or scratch glass.
• DO NOT operate fi replace with glass removed, cracked,
broken or scratched.
• Replace as a complete assembly.
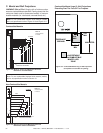
Removing Fixed Glass Assembly
1. Remove the decorative front.
2. Locate the two spring latches that are on the lower left
and right of the fi replace.
3. Use both index fi ngers to release spring latches. See
Figure 14.3.
4. Allow glass to tilt forward. Grasp glass on the upper
return lip of glass frame and tilt glass “out” and “down”.
Lower gently to rest on side supports. See Figure 14.3.
Allow top of glass assembly to tilt forward. Lift glass
assembly “up” and “out”.
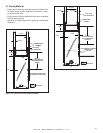
Replacing Fixed Glass Assembly
1. Locate glide tabs on lower left and right corners.
2. Place glass bottom resting on right and left support.
Tilt top of glass assembly toward fi replace.
3. Allow of the gasketing of the glass assembly to touch
the face of the fi replace. Lift the glass “up” and “in” to
upper glass clip fl anges.
4. Hold bottom of the glass as you allow the glass as-
sembly to seat over the two lower glass clips. See
Figure 14.3.
5. Assure proper left and right placement of glass and
engage both lower spring latches.
I. Install the Mesh
A mesh front is included with the RED40 and RED40ST.
For installation instructions, see section 13.D.
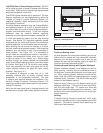
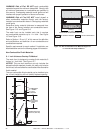
J. Air Shutter Setting
Air shutter settings may be adjusted by a qualifi ed install-
er at the time of installation. The air shutter is set at the
factory for minimum vertical vent run. Adjust air shutter for
longer vertical runs. See Figure 14.4.
• Loosen the 1/4 in. screw.
• Twist shutter to adjust
• Shutter may be open for longer horizontal vent runs.
• Do not close the air shutter more than 1/16 in. for NG or
1/4 in. for LP.
• Tighten the screw.
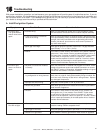
NOTICE: If sooting occurs, provide more air by opening
the air shutter.
Air Shutter Settings
RED40/RED40ST NG LP
GRANITE KIT 1/16 in. 1/4 in.
LIGHT KIT 1/16 in. 1/4 in.
PORCELAIN KIT 1/16 in. 1/4 in.
GLASS CLIP
GLASS TAB
GLASS SIDE
SUPPORT