


Heat & Glo • RED40, RED40ST • 2155-900 Rev. o • 7/12
53
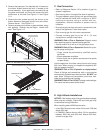
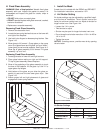
Figure 13.1 Finishing Details
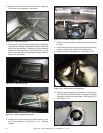
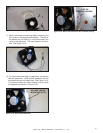
CAUTION! Risk of Glass Damage and Cuts! DO NOT
drill or install any type of screw or fastener into the lower
cover panel. Sharp screw or fastener tips may penetrate
and break the glass or cause cuts.
The RED40 comes standard with a mesh front. The fi nal
fi replace installation can be accomplished by either the
“overlap” or “inside-fi t” method. Reference Section 13.C
regarding installation details associated with the Inside
and Overlap Fit methods.
If the fi nal fi replace installation uses the Overlap Method,
wall sheathing material 1/2 in thick is specifi ed and can
be installed tight to the side fi nishing fl anges and factory-
supplied non-combustible board. If the fi nal fi replace
installation uses the Inside-Fit Method, additional
clearance must be maintained between combustible 1/2
in. thick wall sheathing material and the side fi nishing
fl anges. See Section 13.D regarding installation details
associated with the Inside and Overlap Fit methods and
specifi ed additional non-combustible materials required.
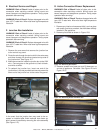
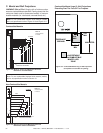
When fi nishing the wall around the fi replace, it is critical
that wall sheathing be fastened properly. Wall sheathing
fasteners, such as screws or nails, are not permitted in
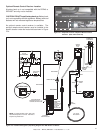
some locations. See Figure 13.2. It is acceptable to
pre-drill holes and use self-tapped screws in the factory-
installed non-combustible board which may be used
to lathe (a backer for tile, marble, etc.) Screws being
installed through the factory-installed non-combustible
board should be self-tapping type with a maximum length
of 2 inches. See Figure 13.2. Do not drill or install screws
which may penetrate the lower cover panel as this will
restrict required access to the glass and lower control
chamber. See Figure 13.1.
The appliance is designed to mate with 1/2 in. wall
sheathing materials such as drywall, plywood, wood
composites, or non-combustible materials. The type
of material used depends whether the installation is an
Inside or Overlap Fit method. Reference Section 13.C
regarding installation details associated with the Inside an
Overlap Fit methods.
Verify that the lower cover panel is installed correctly, and
that there are no screws used to attach drywall to the panel.
Note: It is acceptable to use a high temperature silicone
sealant to adhere drywall to lower cover panel.
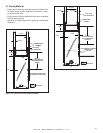
33-1/2 IN. HEIGHT
FACTORY INSTALLED
NON-COMBUSTIBLE BOARD
= NO SCREWS IN THIS AREA
= 2 IN. MAX. SCREW LENGTH
SIDE FINISH NON-COMBUSTIBLE
BOARD (2)
47 IN. WIDTH
FACTORY INSTALLED NON-COMBUSTIBLE BOARD
Finish and Sealing Joints
All joints between the fi nished wall sheathing and the ap-
pliance must be sealed with non-combustible materials.
Sealants, such as caulk or mastic used to seal the gap
between the wall and the fi replace, should be rated at a
minimum continuous exposure to 300ºF.
Finishing Around Opening with Gypsum Wallboard
Gypsum wallboard (drywall) joints adjacent to the fi re-
place opening, including the non-combustible board on
the appliance, require special attention to minimize crack-
ing. When installing gypsum wallboard around the fi re-
place, install the hole for the fi replace opening in a single
wallboard sheet, if possible. This will minimize the joints
adjacent to the fi replace opening.
Tape wall board joints around the fi replace opening with
fi berglass-mesh tape. It will provide a more crack-resis-
tant joint than paper tape. Fill, smooth and fi nish wall
joints with chemically setting-type joint compound. It will
provide a more crack-resistant joint than air-drying light-
weight compound.
Painting
If desired fi nishing includes a painted wall, 100% acrylic
latex with compatible primer is recommended around this
appliance. Oil-based or standard acrylic paints may dis-
color due to heat exposure.