


WattMaster WHP Section 4
4-16 Start-Up and Troubleshooting
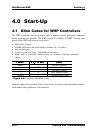
4.4 Installation and Commissioning
Information
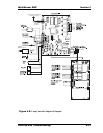
Familiarize yourself with the installation manual and system wiring diagrams
before installing!
1. Check to see if you have all the correct components for your installation.
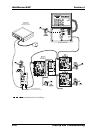
2. Establish the location for the CommLink Interface first. This is where your communi-
cation cable will begin.
3. Layout your communication wiring. For systems with more than 30 WHPs or more
than one MiniLink, there are multiple communication loops:
A. The Network Loop - This loop originates at the CommLink and interconnects
MiniLinks together.
B. The Local Loop – This loop originates at the MiniLink. The WHPs, Loop
Controllers and the System Manager are connected to this loop.
Tip: Using the WattMaster color-coded and labeled Communication Cable insures a
quality installation. It also makes your installation much easier and less likely to
have communications wiring errors!
4
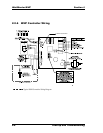
. Communication cable must always be shielded – no exceptions!
5. Mount controllers in appropriate locations according to their operating specification.
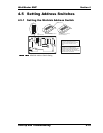
6. Address controllers according to location and addressing instructions located in the
system manual.
7. With no power connected, wire controller according to wiring diagrams and in
accordance with local codes. Never apply power until you have completed these pro-
cedures in accordance to all system instructions.
8. After completing all wiring connections, unplug the terminals for power and commu-
nications. Always unplug the communications loop first and then the power. When
reconnecting the wiring, connect the power first and then the communication loop.
9. Continue step 8 until all devices have been wired and the power and communication
terminals have been unplugged.