


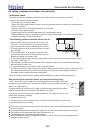

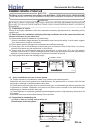
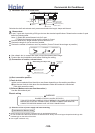
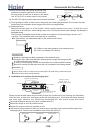


When connecting the drain pipe to unit, pay suffcient attention
not to apply excess force to the piping on the unit side. Also, fix
the piping at a point as close as possible to the unit.
For drain pipe, use hard PVC general purpose pipe VP-25(I.D.1")
which can be purchased locally. When connecting, insert a PVC
pipe end securely into the drain socket before tightening securely
using the attached drain hose and clamp. Adhesive must not be
used connection of the drain socket and drain hose (accessory).
Drain hose
Stage
difference
part
Drain socket
Drain socket
Main unit
VP 25 joint
(field purchased)
Pipe cover(large)
[for insulation]
(accessory)
VP 25
(field purchased)
Pipe cover
[for insulation]
(field purchased)
Drain hose
(accessory)
Pipe cover(small)
[for insulation]
(accessory)
Clamp
(accessory)
Adhesion
(b)
(c)
VP 30
Secure the elevation as high as possible
(approx. 100 mm)
A downhill grade of
1/100 or more
Drain hose
Joint for VP 25
(Local procurement)
600
(Maximum local drain up dimension)
Right overhead
290~325mm
Attached drain hose clamp
Drain piping
Main unit
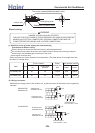
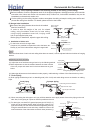
Drain situation can be checked with transparent socket
Remove grommet.
Make sure to install
it back after test.
Insert water supply hose
for 20 mm ~ 30 mm to
supply water.
(Insert hose facing
toward bottom.)
Pour water into a convex joint.
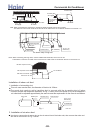
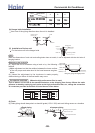
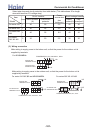
When constructing drain piping for several units, position the
common pipe about 100 mm below the drain outlet of each unit
as shown in the sketch. Use VP-30(11/4") or thicker pipe for this
purpose.
Be sure to provide heat insulation to hard PVC pipes of indoor
placement.
Do not ever provide an air vent.
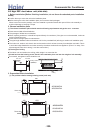
The height of the drain head can be elevated up to a point 500
mm above the ceiling, and when an obstacle exists in the ceiling
space, elevate the piping to avoid the obstacle using an elbow
or corresponding gadget. When doing this, if the stretch for the
needed height is higher than 500 mm, the back-flow quantity of
drain at the event of interruption of the operation gets too much
and it may cause overflow at the drain pan. Therefore, make the
height of the drain pipe within the distance given in the sketch
below.
Avoid positioning the drain piping outlet at a place where generation
of odor may be stimulated. Do not lead the drain piping direct
into a sewer from where sulfur gas may generate.
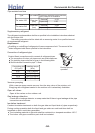
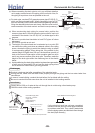
Drainage
Conduct a drainage test after completion of the electrical work.
During the trial, make sure that drain flows properly through the piping and that no water leaks from
connections.
In case of a new building, conduct the test before it is furnished with the ceiling.
Be sure to conduct this test even when the unit is installed in the heating season.
Procedures
Supply about 1000 cc of water to the unit through the air outlet using a feed water pump.
Check the drain while cooling operation.
(d)
(e)
(f)
(h)
(g)
1
2
3
4
1
2
(In the electrical work has not been completed,
connect a convex joint in the drain pipe connection
to provide a water inlet. Then, check if water leaks
from the piping system and that drain flows through
the drain pipe normally.)
>a__WcU[S^ <[c >a`V[e[a`Wc
-99-