


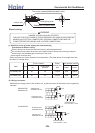
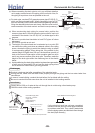
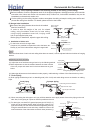


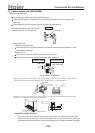

(3) Hanger bolts installation
Use care of the piping direction when the unit is installed.
Hanging bolt M10
Hole-in anchor
Hole-in plug
Insert
Concrete
(2) If necessary, cut the opening installation and checking needed on the ceiling. (If has ceiling)
Before installation, finish the preparation work of all the pipes (refrigerant, drainage) and wire (wire controller
connection wire, indoor and outdoor unit connection wire) of indoor unit, so that after installation, they can be
immediately connected with outdoor unit.
Cut the opening on the ceiling. Maybe it needs to strengthen the ceiling to keep the ceiling even and flat and
prevent the ceiling from vibration. For details, please consult to the builder.
(Use M10 screw bolt)
In order to bear the weight of the unit, for existed
ceiling, using foundation screw bolt, for new ceiling,
using burying embedded screw bolt, burying screw
bolt or spot supplied other parts.
Before going on installation, adjust the gaps with ceiling.
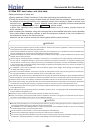
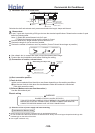
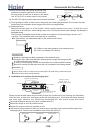
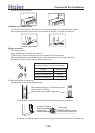
4. Installation of indoor unit
Fix the indoor unit to the hanger bolts.
If required, it is possible to suspend the unit to the beam, etc.
Directly by use of the bolts without using the hanger bolts.
When the dimensions of main unit and ceiling holes does not match, it can be adjusted with the slot holes of hanging
bracket.
Note
Adjusting to the levelness
(a) Adjust the out-of levelness using a level or by the following method.
Make adjustment so that the relation between the lower surface
of the unit proper and water level in the hose becomes as given
below.
(b) Unless the adjustment to the levelness is made properly, malfunctioning or failure of the float switch may occur.
PVC hose
Piping side
Supply water
Water level
0~5 mm
(0~0.2")
Bring the piping side slightly lower.
Hanging bolt
M10 nut
Main unit
M10 washer
M10 spring washer
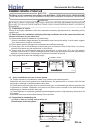
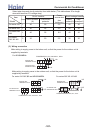
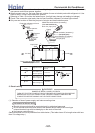
Drain hose
Stage
difference
part
Drain socket
Drain socket
Main unit
VP 25 joint
(field purchased)
Pipe cover(large)
[for insulation]
(accessory)
VP 25
(field purchased)
Pipe cover
[for insulation]
(field purchased)
Drain hose
(accessory)
Pipe cover(small)
[for insulation]
(accessory)
Clamp
(accessory)
Adhesion
For drain pipe, use hard PVC general purpose pipe VP-25(I.D.1")
which can be purchased locally. When connecting, insert a PVC
pipe end securely into the drain socket before tightening securely
using the attached drain hose and clamp. Adhesive must not be
used connection of the drain socket and drain hose (accessory).
(c)
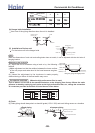
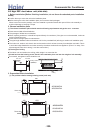
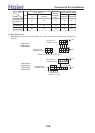
5. Drain Piping
(a) Drain piping should always be in a downhill grade (1/50~1/100) and avoid riding across an elevation or making
traps.
When connecting the drain pipe to unit, pay suffcient attention not to apply excess force to the piping on the unit
side. Also, fix the piping at a point as close as possible to the unit.
Do not pipe under water
Keep free from traps
Avoid riding across an elevation
Air vent
Inproper piping
Good piping
1.5m ~ 2m
Suspension
bolts
Heat
insulation
A downhill grade
of 1/100 or more
(b)
>a__WcU[S^ <[c >a`V[e[a`Wc
-103-