


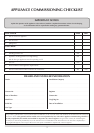

ENSURE THAT THE APPLIANCE IS CORRECTLY
ADJUSTED FOR THE GAS TYPE AND CATEGORY
APPLICABLE IN THE COUNTRY OF USE. REFER TO THE
DATABADGE AND TECHNICAL SPECIFICATIONS ON
PAGE 9
FOR DETAILS OF CHANGING BETWEEN GAS TYPES
REFER TO SECTION 11 OF THE SERVICING
INSTRUCTIONS.
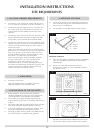
1.1 This appliance must be installed in accordance with the
rules in force, and used only in a sufficiently ventilated
space. Please read these instructions before installation and
use of this appliance.
1.2 These instructions must be left intact with the user.
1.3 Do not attempt to burn rubbish on this appliance.
1.4 In your own interest, and those of safety, this appliance
must be installed by competent persons in accordance with
local and national codes of practice. Failure to install the
appliance correctly could lead to prosecution.
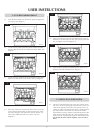
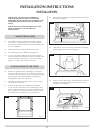
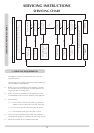
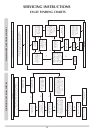
2.1 Remove the appliance from its packaging. It will now be
necessary to decide upon top or rear flue exit, the stove is
factory built for rear exit but is easily converted by swapping
the flue spigot with the blanking plate and putting the
blanking plate on the rear of the stove.
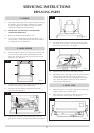
2.2 Open the lower door by pressing until a “click” is heard,
and gently lowering down.
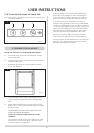
2.3 Remove the glass frame by undoing the six pozidrive
screws. The four black screws are for removing the entire
firebox if required. Remove the ceramic components and
place carefully to one side. Remove the lower cover panel
by undoing the two pozidrive screws. See diagram 1.
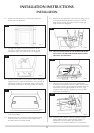
2.3 Disconnect the lead for the touchpad and the two leads for
the TTB See Diagram 2.
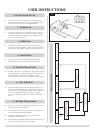
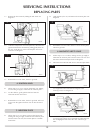
2.4 Undo the two screws at the back of the firebox and gently
pull the burner unit forward. See diagram 3.
2.5 At the rear of the burner unit, undo the thermocouple and
disconnect the TTB leads. Now remove the burner unit
completely. See diagram 4.
2. INSTALLATION OF THE STOVE
1. SAFETY PRECAUTIONS
11
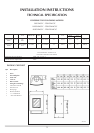
INSTALLATION INSTRUCTIONS
INSTALLATION
1
2
3
AR1454
AR1463
AR1457
4
AR1462