


37
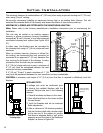
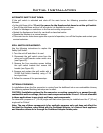
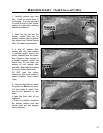
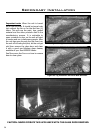
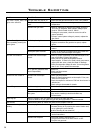
Figure 63: Top brick panel in place, screws shown. Figure 64: Back brick panel in place.
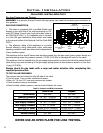
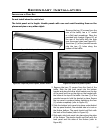
Figure 65: Side brick panels in place.
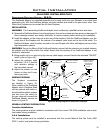
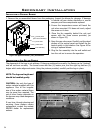
Figure 62: Brick panel bracket, slots shown.
1. Remove the two (2) screws from the
rear of the bafe, use a ¼” socket
or a at head screwdriver. Place the
provided brick bracket (Figure 62) at
the rear of the bafe with the slots
over the screw holes (see Figure 63).
Insert two (2) of the provided screws
into the two (2) holes along the
bottom of the bafe.
2. Remove the two (2) screws from the front of the
bafe. Slide the top brick panel into the bottom
bracket and place the other brick bracket over the top
of the panel and line up the slots on the bracket with
the holes at the top of the bafe. Use two (2) of the
provided screws to hold the bracket in place. Ensure
the top panel is centered before tightening the four
(4) screws completely (refer to Figure 63).
3. Slide the bottom brick panel into place under/behind
the top panel bracket, the notched side is to rest on
the rebox bottom. The panel should rest ush with
the back of the rebox (refer to Figure 64).
4. Slide each side brick panel into place along the sides
of the rebox. The panels should rest ush with the
back panel and the sides of the rebox (refer to
Figure 65).
Secondary Installation
instaLLation oF PaneL set:
Do not install when the unit is hot.
The brick panel set is fragile. Handle panels with care and avoid knocking them on the
placement pins or any other object.