


www.desatech.com
115254-01A 9
AIR FOR COMBUSTION
AND VENTILATION
Continued
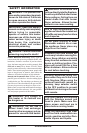
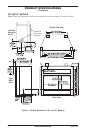
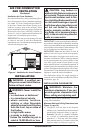
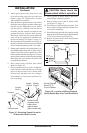
Figure 4 - Ventilation Air from Outdoors
Ventilation Air From Outdoors
Provide extra fresh air by using ventilation grills or
ducts. You must provide two permanent openings:
one within 12" of the ceiling and one within 12"
of the floor. Connect these items directly to the
outdoors or spaces open to the outdoors. These
spaces include attics and crawl spaces. Follow the
National Fuel Gas Code, ANSI Z223.1/NFPA 54,
Section 5.3, Air for Combustion and Ventilation for
required size of ventilation grills or ducts.
IMPORTANT: Do not provide openings for inlet
or outlet air into attic if attic has a thermostat-
controlled power vent. Heated air entering the attic
will activate the power vent.
INSTALLATION
WARNING: A qualified ser-
vice person must install firebox.
Follow all local codes.
WARNING: Never install the
firebox
• in a bedroom or bathroom*
• in a recreational vehicle
• where curtains, furniture,
clothing or other flammable
objects are less than 42 inches
from the front, top or sides of
the firebox
• in high traffic areas
• in windy or drafty areas
* Unless the installed log set is
rated at 10,000 Btu/Hr or less.
Outlet
Air
Ve
ntilated
Attic
Outlet
A
ir
Inlet
Air
Inlet Air
Ve
ntilated
Crawl Space
To
Crawl
Space
To Attic
CAUTION: Log heaters in-
stalled in this firebox create warm
air currents. These currents move
heat to wall surfaces next to fire-
box. Installing firebox next to vinyl
or cloth wall coverings or operat-
ing firebox where impurities (such
as, but not limited to, tobacco
smoke, aromatic candles, clean-
ing fluids, oil or kerosene lamps,
etc.) in the air exist, may discolor
walls or cause odors.
IMPORTANT: Vent-free gas log heaters add mois-
ture to the air. Although this is beneficial, installing
firebox in rooms without enough ventilation air may
cause mildew to form from too much moisture. See
Air for Combustion and Ventilation, page 7.
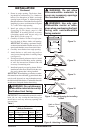
IMPORTANT: Make sure the firebox is level. If
firebox is not level, log set will not work properly.
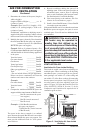
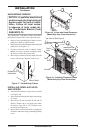
Note: Your firebox is designed to be used in zero
clearance installations. Wall or framing material
can be placed against any exterior surface on the
rear, sides, top or bottom of your firebox, except
where standoff spacers are integrally attached. If
standoff spacers are attached to your firebox, these
spacers can be placed directly against wall or fram
-
ing materials. Use the dimensions shown for rough
opening to create the easiest installation.
Use dimensions shown for rough openings to
create the easiest installation (see Built-In Firebox
Installation, page 11).
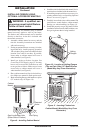
INSTALLATION CLEARANCES
WARNING: Maintain the
minimum clearances. If you can,
provide greater clearances from
floor, ceiling and adjoining wall.
Carefully follow these instructions. This will
ensure safe installation.
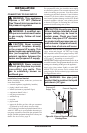
Minimum Wall and Ceiling Clearances (see
Figure 5, page 10)
A. Clearances from the side of the fireplace
cabinet to any combustible material and wall
should follow diagram in Figure 5, page 10.
Example: The face of a mantel, bookshelf,
etc. is made of combustible material and
protrudes 3
1
/
2
" from the wall. This combus-
tible material must be 4" from the side of the
fireplace cabinet (see Figure 5, page 10).