


SEWING THE STITCHES
Utility Stitches
81
3
Button Sewing
Buttons with 2 or 4 holes can be sewn on.
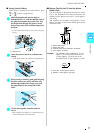
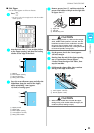
a
Press .
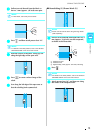
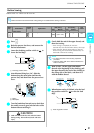
b
Raise the presser foot lever, and remove the
flat bed attachment.
c
Lower the feed dog position switch to to
lower the feed dogs.
a Feed dog position switch
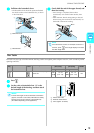
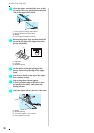
d
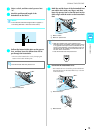
Attach button fitting foot “M”, slide the
button along the metal plate and into the
presser foot, and then lower the presser foot
lever.
a Button
b Metal plate
e
Turn the handwheel toward you to check that
the needle correctly goes into the holes of the
button without touching it.
f
Gently hold the end of the upper thread, and
then start sewing.
* Once sewing is completed, the machine
automatically sews reinforcement stitches, then stops.
* If the automatic thread cutting setting is selected
before sewing, the machine will automatically cut
the thread at the end of stitching.
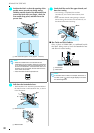
g
With scissors, cut the upper and bobbin
threads at the beginning of the stitching, pull
the upper thread at the end of the stitching to
the wrong side of the fabric, and then tie it
with the bobbin thread.
h
When button sewing is finished, raise the feed
dog position switch to to raise the feed
dogs.
a Feed dog position switch
Note
Make sure that the automatic thread cutting setting is not selected when sewing on buttons.
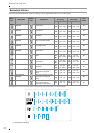
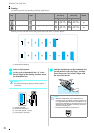
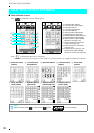
Stitch
Key
Stitch Name
Presser
Foot
Applications
Stitch width
[mm (inch.)]
Stitch length
[mm (inch.)]
Twin
needle
Auto. Manual Auto. Manual
Button sewing
Attaching buttons
3.5
(1/8)
2.5 - 4.5
(3/32 - 3/16)
— —NO
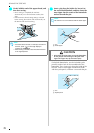
CAUTION
• Make sure the needle does not strike the button
during sewing. The needle may break and cause
injury.
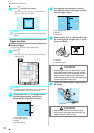
a
a
b
Note
• To attach the button more securely, repeat the
procedure.
• Adjust the stitch width to the distance between the
holes in the button.
a