


USER MANUAL
ENGLISH
RS 501 33015501(3)2008-02 A
21
DUST CONTROL SYSTEM WATER TANK EMPTYING
When necessary, empty the dust control system water tanks (6 and 18, Fig. G) according to the following procedure.
Turn off the engine, by turning the ignition key (17, Fig. D) counterclockwise, to the end of stroke, then remove it.
Engage the parking brake (7, Fig. E).
Remove the right and left tank drain plugs (33 and 34, Fig. G).
Drain all the water from the tanks.
Install the drain plugs (33 and 34, Fig. G).
TOWING THE MACHINE
To tow the machine, proceed as follows.
Dump the hopper (12, Fig. G), if possible. If it contains a small quantity of waste, it is not necessary to dump it.
Engage the parking brake (7, Fig. E).
Lift the safety fl ange (23, Fig. E), then lift the hopper (12, Fig. G) with the lever (10, Fig. E).
WARNING!
To avoid machine unbalance, perform the hopper dumping on a solid and level ground, especially if the hopper
is nearly full and it is not possible to dump it.
Keep people away from the machine and especially from the hopper (12, Fig. G).
WARNING!
If it is necessary to move the machine when the hopper is lifted, move very slowly (maximum speed 1 km/h).
Turn off the engine, by turning the ignition key (17, Fig. D) counterclockwise, to the end of stroke, then remove it.
Remove the lifted hopper locking pins (9, Fig. F) from the housings (10), and place them into the holes (11).
Open the right lid (16, Fig. G) by releasing the fasteners (17) with the supplied key.
Empty the dust control system water tanks (6 and 18, Fig. G) according to the instructions shown in the relevant paragraph.
Remove the screw (19, Fig. F) and open the right tank (17) outwards.
WARNING!
Open the tanks (17 and 21, Fig. F) outwards, only if they are empty: each tank contains 120 kg of water
approximately.
Loosen the drive system pump screw (1, Fig. N) two turns.
Set the machine to working mode, by performing steps 3, 4, 5, 7 and 8 in the reverse order.
Tow the machine.
When the machine towing is completed:
Perform steps 3, 4, 5, 7 and 8.
Install the screw (1, Fig. N).
Perform steps 3, 4, 5, 7 and 8 in the reverse order.
TRANSPORTING BY TRAILER
To transport the machine with a trailer, use the hooks and anchors shown below.
WARNING!
Machine anchorage must be performed by qualifi ed personnel.
Available hooks
The machine is equipped with the following hooks:
No.1 front towing/anchor hook (1, Fig. B).
No.1 rear anchor hook (2, Fig. B).
Anchorage
To anchor the machine in case of transport by trailer, proceed as follows:
Set the machine to transport mode (see the procedure in the relevant paragraph).
Remove the ignition key (17, Fig. D).
Engage the parking brake (7, Fig. E).
Close all lids, panels, etc.
Anchor the machine with the front and rear towing hooks (1 and 2, Fig. B).
Anchor the machine with two suitable bands (4 and 5, Fig. B), placed over the rear axle support (6), and on the front left
and right cab footboards (3) respectively.
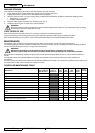
1.
2.
3.
4.
5.
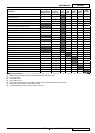
1.
2.
3.
4.
5.
6.
7.
8.
9.
10.
11.
12.
•
•
•
1.
•
•
2.
•
•
•
•
•
•