


ENGLISH
USER MANUAL
14
33015501(3)2008-02 A RS 501
USE
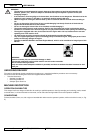
WARNING!
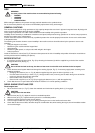
On some points of the machine there are some adhesive plates indicating:
DANGER
WARNING
CAUTION
CONSULTATION
–
–
–
–
While reading this Manual, the operator must pay particular attention to the symbols shown.
Do not cover these plates for any reason and immediately replace them if they are damaged.
GENERAL CAUTIONS
This machine is designed as a high performance, high capacity sweeper that can clean in tight and congested areas. By design this
means a narrow wheel base with tight steering capability.
These design requirements can under certain conditions create instability during machine operation.
Instability can be caused by a combination of machine travel speed, abrupt manoeuvring, operation on an incline, low tyre pressure,
weight in the hopper and or raised hopper.
For this reason the machine must be driven by a qualifi ed operator who must be properly instructed on how to use it and be aware
of the potential risks.
The following are situations known to cause instability in the machine and care should be taken by the operator to assure safe
operation:
Lifting the hopper on an incline
Manoeuvring the machine with the hopper lifted
Abrupt steering
Manoeuvring with speed, on a slope and/or with weight in the hopper
Low tyre pressure
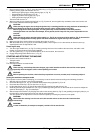
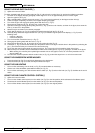
Inside the cab there is a decal (33, Fig. E) that warns the operator of the risk of instability and provides information on activities to
avoid to prevent machine instability (see picture).
BEFORE START-UP
If necessary, open the left upper lid (4, Fig. G) by releasing the fasteners (5) with the supplied key, and refuel the machine
through the fi ller neck (28, Fig. F).
CAUTION!
Do not fi ll the fuel tank to the top, but leave at least 4 cm from the fi ller neck to allow the fuel to expand.
Check the dust control system water level through the warning light (23, Fig. D). If necessary, supply water according to the
following procedure:
Disengage the fasteners (5 or 17, Fig. G) with the supplied key, then open the left or right lid (4 or 16).
Pour the water in the tanks (17 and 21, Fig. F), through the fi ller neck (18 or 22): pour the water through one of the fi ller
necks only, because the tanks are connected.
Close the fi ller neck (18 or 22, Fig. F).
Close the left or right lid (4 or 16, Fig. G) by engaging the fasteners (5 or 17) with the supplied key.
Check that there are no open lids/hoods and that the machine is in normal operating conditions.
DIESEL ENGINE START AND STOP
Diesel engine start
Sit on the driver’s seat (17, Fig. E), fasten the seat-belts and check that the parking brake (7) is engaged.
CAUTION!
Always fasten the seat belts.
With the lever (22, Fig. E), adjust the seat for a comfortable position.
With the lever (6, Fig. E), adjust the steering wheel for a comfortable position.
Adjust the rearview mirrors to easily see rear wheels.
Turn the engine throttle lever (16, Fig. E) to idle by pressing the lever on the handle at the same time.
Check that the brooms are lifted, otherwise keep into consideration that, when starting the engine, broom immediate rotation
can cause damages.
–
–
–
–
–
1.
2.
•
•
•
•
3.
1.
2.
3.
4.
5.
6.