


7
SECTION B
Jacketed Cable Preparation
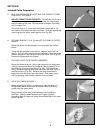
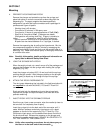
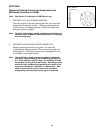
9. BUFFER REMOVAL
With the modified No-Nik tool's arrow pointing in the direction of
the stripping, remove the fiber's buffer in small bites, about 3/16"
(5 mm).
Be sure to remove the stripped material from the tool after each
incremental cut. When stripping the last increment, the end of the
stripping collar should gently rest against the fiber guide inside of
the clearance hole of the No-Nik (Fig. B7). This will ensure the
correct
9/16" (14 mm) buffer length remaining.
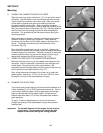
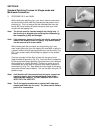
10. CLEAN THE FIBER WITH ALCOHOL
With the collar still in place, moisten a lint free cloth with isopropyl
alcohol from the bottle and wipe the fiber clean (Fig. B8). Make
sure there is absolutely no buffer residue or dirt on the fiber by
holding it to a light and inspecting for a smooth shiny surface. If
necessary, wipe the fiber a second time to be sure that it is clean.
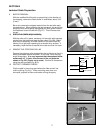
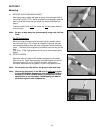
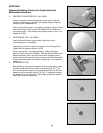
11. REMOVE THE STRIPPING COLLAR
Remove the stripping collar and position the cut Kevlar so that it is
evenly distributed around the buffer. At this time, verify the strip
length dimensions. It is very important that the exposed buffer
measures 9/16" (14 mm) from the end of the cut jacket as
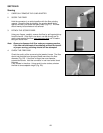
shown in Fig. B9. (Figure not to scale). Confirm all dimensions
using the ruler provided (Fig. B10).
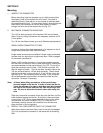
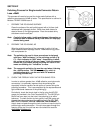
12. PROTECT PREPARED FIBERS
Clip the cable in the curing stand where the fiber end will not
touch anything (Fig. B11). When mounting more than one
connector, prepare all fiber ends before mixing the epoxy.
Fig. B7
Fig. B8
Fig. B10
Fig. B11
Fig. B9
Outer Jacket
5/16" (8 mm)
Kevlar
9/16"
(14 mm)
1 3/16"
(30 mm)