


Tools Needed:
33
Please Do Not Return This Product To The Store. Contact your local Wayne-Dalton dealer. To find your local Wayne-Dalton dealer, refer to your
local yellow pages/business listings or go to the Find a Dealer section online at www.Wayne-Dalton.com
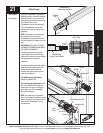
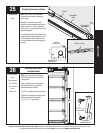
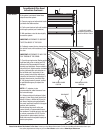
Winding Springs Continued...
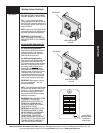
PAWL KNOB IN LOWER
POSITION
END BRACKET
PAWL KNOB IN UPPER
POSITION
END BRACKET
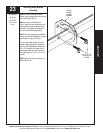
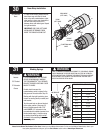
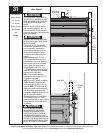
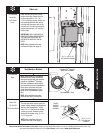
Spring Turns
Door Height Spring Turns
(6’ - 0”) 14
(6’ - 3”) 14 - 1/2
(6’ - 5”) 15
(6’ - 6”) 15
(6’ - 8”) 15 - 1/2
(6’ - 9”) 15 - 1/2
(7’ - 0”) 16
(7’ - 3”) 16 - 1/2
(7’ - 6”) 17
(7’ - 9”) 17 - 1/2
(8’ - 0”) 18
Number of Installed Spring Turns
LOCATION FOR
MARKING NUMBER
OF INSTALLED
SPRING TURNS
BACK OF TORQUEMASTER
®
PLUS END BRACKET WARNING TAG
INSTALLATION
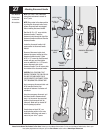
IMPORTANT: PAWL KNOB MUST BE
IN UPPER POSITION TO ADD/ REMOVE
REQUIRED NUMBER OF SPRING TURNS.
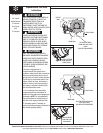
After 2-3 turns, remove the ratchet
wrench and adjust the cable on the left
side (STEP 29). Ensure the cables are in
the first groove and the cable drums, as
shown in Step 29.
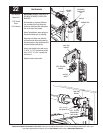
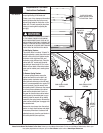
NOTE: Single spring application require
no spring winding on the left hand side,
but meed cable tension adjustments.
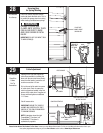
IMPORTANT: COUNTERBALANCE
CABLE TENSION MUST BE EQUAL ON
BOTH SIDES PRIOR TO FULLY WINDING
SPRINGS.
SEE THE SPRING TURN CHART FOR
THE REQUIRED NUMBER OF TURNS:
For single spring applications:
Return to the right hand and continue
winding the spring to the required
number of turns for your door. Place
pawl knob in lower position.
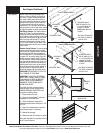
For double spring applications:
Place a mark on the winding shaft and
end bracket. Place the ratchet with
5/8” socket onto the left hand winding
shaft end. To wind the spring, rotate
the winding shaft clockwise, while
watching the mark on the winding
shaft.Rotate the winding shaft to the
required number of turns for your door.
Then return to the right hand side
and wind the right hand spring to the
required number of turns. Place pawl
knob in lower position on both sides.
IMPORTANT: Mark number of spring
turns on TorqueMaster
®
Plus end
bracket warning tag.
NOTE: Since total turns to balance door
can deviate from SPRING TURN CHART
values by ± 1/2 turn, adjustments to
the recommended number of turns
may be required AFTER rear hangers
assembly is completed.
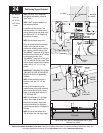
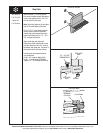
IMPORTANT! HOLD THE DOOR DOWN
TO PREVENT IT FROM RISING
UNEXPECTEDLY IN THE EVENT THE
SPRING WAS OVERWOUND AND
CAUTIOUSLY REMOVE VICE CLAMPS
FROM VERTICAL TRACKS.
IMPORTANT! ADJUSTMENTS TO THE
RECOMENDED NUMBER OF TURNS
MAY BE REQUIRED. IF DOOR RAISES
OFF THE FLOOR UNDER SPRING
TENSION ALONE, THEN REDUCE
SPRING TENSION UNTIL DOOR REST
ON THE FLOOR. IF THE DOOR IS HARD
TO RAISE OR DRIFTS DOWN ON ITS
OWN, THEN AD SPRING TENSION.