


Please Do Not Return This Product To The Store. Contact your local Wayne-Dalton dealer.
To find your Wayne-Dalton dealer; refer to your local yellow pages / business listings or go to Find a dealer area online at www.wayne-dalton.com
21
Tools Needed:
INSTALLATION
13
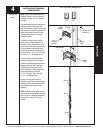
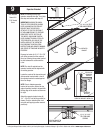
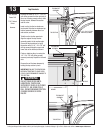
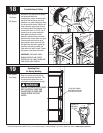
Top Brackets
Remove, but retain (2-4) 1/4”- 14 x 7/8”
self drilling screws from the right side of
the u-bar, allowing enough room to slide
the top bracket between the section
and the u-bar.
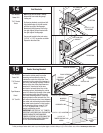
Insert a roller into the low headroom
top bracket. Slide the low headroom top
bracket assembly between the u-bar
and section, as shown.
Twist the roller into the upper track.
Align the edge of the top bracket
assembly parallel to the section edge.
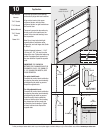
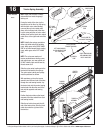
Secure the top bracket and u-bar to
the section with (3) 1/4”- 20 x 7/8” self
drilling screws through the upper and
lower slots of the bracket, as shown.
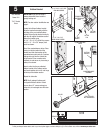
Finish re-attaching the u-bar using the
1/4”- 20 x 7/8” self drilling screws
removed previously. Repeat for left hand
side.
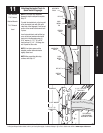
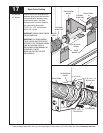
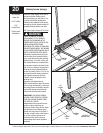
Remove the nail that was temporarily
holding the top section in place.
IMPORTANT: FAILURE TO REMOVE NAIL
BEFORE ATTEMPTING TO RAISE DOOR
COULD CAUSE PERMANENT DAMAGE TO
TOP SECTION.
DO NOT RAISE DOOR UNTIL
HORIZONTAL TRACKS ARE
SECURED AT REAR, AS OUTLINED
IN STEP 21, OR DOOR COULD
FALL FROM OVERHEAD POSITION
CAUSING SEVERE OR FATAL
INJURY.
WARNING
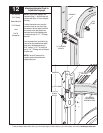
(3) 1/4”-20 X 7/8” SELF
DRILLING SCREWS
TOP BRACKET
ASSEMBLY
TOP SECTION
TOP SECTION
HEADER
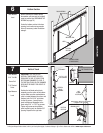
TOP BRACKET
ASSEMBLY
TOP SECTION
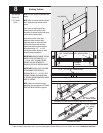
TOP BRACKET
ASSEMBLY
SECTION EDGE
Power Drill
7/16” Socket
Driver
Hammer