


Please Do Not Return This Product To The Store. Contact your local Wayne-Dalton dealer.
To find your Wayne-Dalton dealer; refer to your local yellow pages / business listings or go to Find a dealer area online at www.wayne-dalton.com
14
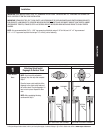
Tools Needed:
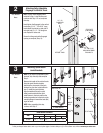
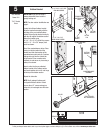
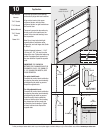
Bottom Bracket
IMPORTANT: Right and left hand is
always determined from inside the
garage looking out.
NOTE: For door section identification see
page 4.
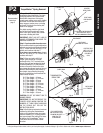
Locate the left hand bottom bracket.
Align the bracket horizontally with the
top edge of the pre-installed bottom
bracket. Also align the bracket vertically
with the left edge of the bottom section.
Attach the bracket using
(4) 1/4”- 20 x 11/16” self drilling screws
and (1) 1/4” - 20 x 5/8” tamper proof
screw as shown.
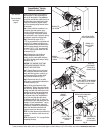
Uncoil the counterbalance cables. Place
clevis pin into the inside tab of the
bracket and slide the teardrop of the
counterbalance cable onto pin. Continue
sliding clevis pin thru the outside tab
of the bracket. Place a washer onto
mildford pin and secure in place using a
cotter pin as shown.
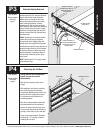
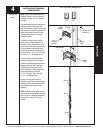
Insert a roller into the pre-attached
bottom bracket of the bottom section
and insert another roller at #1 end hinge
at the top of the bottom section.
Repeat for other side.
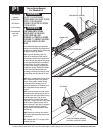
NOTE: Verify astragal (bottom seal)
is aligned with door section. If there
is more than 1/2” excess astragal on
either side, trim astragal even with door
section.
Power Drill
7/16” Socket
Driver
5
BOTTOM
SECTION
ASTRAGEL
BOTTOM
SECTION
(4) 1/4”-20 X 11/16” SELF
DRILLING SCREWS
BOTTOM
BRACKET
3/8” FLAT
WASHER
COTTER
PIN
TEARDROP OF
COUNTERBALANCE
CABLE
CLEVIS
PIN
BOTTOM
BRACKET
BOTTOM
BRACKET
COUNTERBALANCE
CABLE
COUNTERBALANCE
ASSEMBLY
BOTTOM BRACKET ASSEMBLY
ROLLER
PRE-ATTACHED
BOTTOM BRACKET
BOTTOM
SECTION
(1) 1/4”- 20 X 5/8”
TAMPER PROOF SCREW