


Please Do Not Return This Product To The Store. Contact your local Wayne-Dalton dealer.
To find your Wayne-Dalton dealer; refer to your local yellow pages / business listings or go to Find a dealer area online at www.wayne-dalton.com
13
Tools Needed:
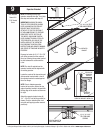
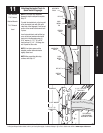
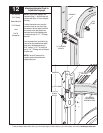
INSTALLATION
NOTE: If quick install flagangles were
installed in Step 3, skip this step and
continue with Step 5. If not, complete
this step.
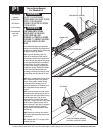
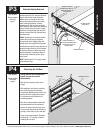
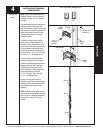
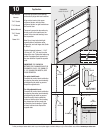
The bottom jamb bracket is always the
shortest bracket included with your
door. If three jamb brackets are included
with the door, the middle bracket on the
track is the middle bracket in height.
The top jamb bracket is the tallest
bracket included.
To attach the bottom jamb bracket,
locate the lower hole/slot pattern of
the vertical track. Align the slot in the
jamb bracket with the lower hole of the
hole/slot pattern in the vertical track.
Loosely hand fasten the bracket onto
the track with (1) 1/4”-20 x 9/16” track
bolt and (1) 1/4”- 20 flange hex nut.
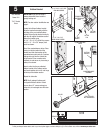
Place the center jamb bracket over
the hole/slot pattern that is centered
between the bottom jamb bracket and
flagangle. Align the slot in the jamb
bracket with the lower hole of the
hole/slot pattern. Loosely hand fasten
the bracket onto the track with
(1) 1/4”-20 x 9/16” track bolt and
(1) 1/4”- 20 flange hex nut.
Repeat if a third jamb bracket is
provided, equally spacing the distance
between the two center jamb brackets
and the bottom jamb bracket and
flagangle.
NOTE: While the bottom jamb bracket
is the shortest in length that is included
with your door. It does not necessarily
mean it is the “short” (ST-0) jamb
bracket.
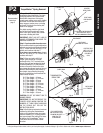
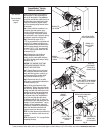
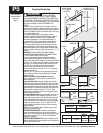
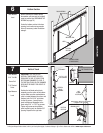
Installing Fully Adjustable
Jamb Brackets
1ST SET
3RD SET
FULLY ADJUSTABLE JAMB BRACKETS
JAMB
BRACKET
HOLE/SLOT
PATTERN
(1) 1/4”-20 X 9/16”
TRACK BOLT
(1) 1/4”-20
FLANGE
HEX NUT
JAMB BRACKET
VERTICAL
TRACK
VERTICAL
TRACK
None
2ND SET
4
ST-0 ST-1