


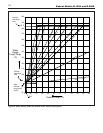

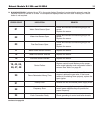
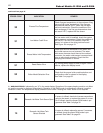
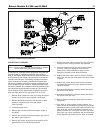

Bobcat Models B-120A and B-200A
43
CONVERTING TO PROPANE
A conversion kit, complete with the appropriate orifice disk and
conversion label, is available for performing this procedure.
Refer to the Bobcat model B-120’s boiler’s parts list publication
B-10PL for the kit part number.This conversion kit can only be
used for the B-120 boiler.The following procedure for perform-
ing the conversion to Propane is intended for a Bobcat boiler
that is not yet installed. If the boiler is already installed, be sure
to turn the gas and power supply off, before proceeding. Once
the boiler is installed, the combustion should be checked, as per
the instructions and specifications on page 36. The fuel input
r
ate for Propane will be appro
ximately as specified on page 2,
when the supply pressure is in the range of 10” to 14” w.c
.
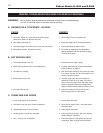
1.
Remo
ve boiler jacket front cover, by turning the 2 black
scre
ws 1/4 turn to the open position. Lift off panel.
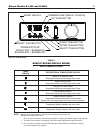
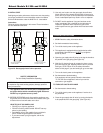
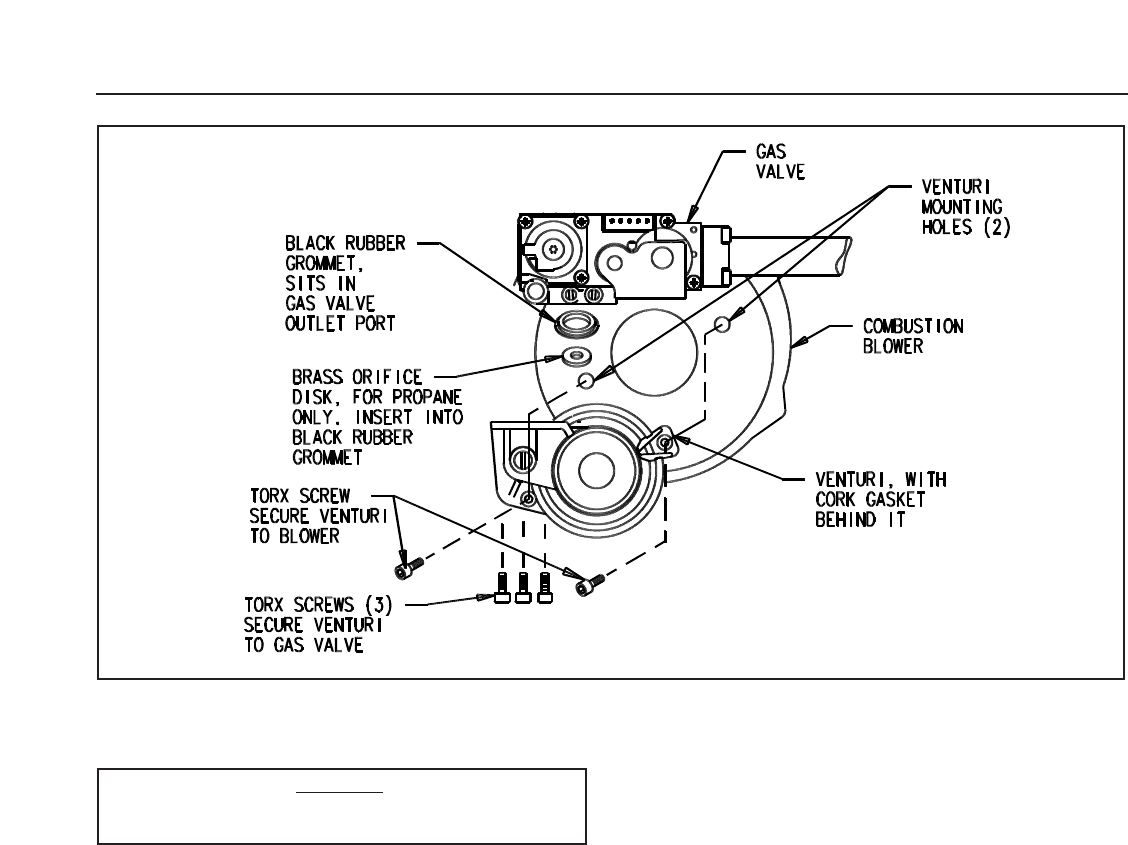
2. Remove the blower box cover, held in place by the 8
screws, to access the gas valve and venturi.
(See Figure 28).
3. Loosen gas pipe union.
4. Remove the 2 Phillips screws securing the venturi to
the blower.
5. Remove the 3 Phillips screws securing the gas valve to
the venturi. (See Figure 27).
6. Remove the venturi, taking note of the position of the
gasket behind it, for reassembly purposes.
7. Remove the black rubber grommet from the underside
of the gas valve, where the venturi was attached.
8. Place the Propane orifice disk into the black rubber
grommet, confirm the stamp on the orifice disk
matches the number specified on page 2 of this
manual for the boiler model being converted.
9. Replace the black rubber grommet, with the Propane
orifice disk, into the gas valve pocket from which it was
removed.
10. Replace the venturi, being careful that the grommet
and gask
et are k
ept in the proper positions until the
venturi is secured.
11. Reinstall and tighten the 2 Phillips screws that secure
the venturi to the blower.
12.
Reinstall and tighten the 3 Phillips scre
ws that secure
the venturi to the gas valve.
13.
Affix the Propane conv
ersion label next to the boiler
rating plate.
14. If the boiler is in the process of being installed, it is
best to check the combustion and make any necessary
adjustments before replacing the blower box cover. See
page 36 of this manual. If the boiler installation is to
occur at a future time, the blower box cover and jacket
front cover can now be reinstalled, and the combustion
chec
k should be perf
or
med after the boiler is installed.
Figure 27. Propane orifice installation.
WARNING:
Only a trained, experienced Service Technician or Installer
should perform the conversion procedure.