


29
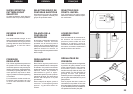
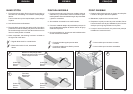
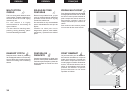
REMOVING FABRIC
First turn the handwheel towards you
until the needle is at its highest
position, then raise the presser foot,
draw materials to the rear and cut off
excess thread with the thread cutter
located on the left end of working
surface or on the presser bar.
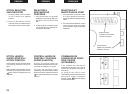
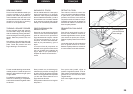
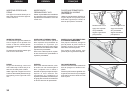
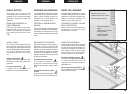
TURNING A SQUARE CORNER
To turn a square corner 5/8" (16 mm)
from the fabric edge, stop stitching
with the needle tip piercing the fabric,
when reaching the cornering guide as
shown. Raise the presser foot, turn
fabric.
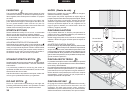
New stitching line will align with 5/8"
(16 mm) seam guide on side of needle
plate. Lower the presser foot and
begin stitching in new direction.
SACANDO EL TEJIDO
Gire el volante hacia Vd. hasta que la
aguja se encuentre en su posición
más alta, suba la pata prensatelas
lleve el matarial hacia atras y corte el
hilo sobrante con el cortador situado
en el extremo izquierdo del area de
trabajo o en la barra del prensatelas.
GIRO EN ESQUINAS EN
ANGULO RECTO
Para girar en una esquina en ángulo
recto a 16 mm. del borde del tejido,
parar la costura con la punta de la
aguja atravesando el tejido, cuando
se está alcanzando la guía de
esquinas, tal como está mostrado.
Alzar el pie prensatelas y girar el
tejido.
La nueva línea de pespuntes se
alineará con la guía de costura de 16
mm. en el lateral de la plancha de
aguja. Bajar el pie prensatelas y
empezar la costura en la dirección
nueva.
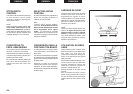
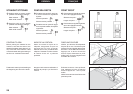
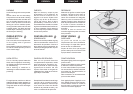
For twin needle stitching set at center
needle position. Thread left spool of
thread in left needle and right spool
in right needle.
For gathering set stitch length to 4.
After row of stitching is completed,
hold bobbin thread and gather fabric
as desired.
Para puntada con la doble aguja,
seleccione la posición de la aguja en
el centro. El hilo del carrete izquierdo
debe ir en la aguja del lado izquierda
y el hilo del carrete derecho en la
aguja del lado derecho.
Para plizados seleccione la longituo
del punto 4.
Cornering guide
Guía de esquinas
Guide d'angle
ENGLISH ESPAÑOL FRANÇAIS
RETRAIT DU TISSU
Tout d'abord, tournez le volant vers
vous pour amener l'aiguille en position
la plus haute, puis relevez le pied
presseur, tirez le tissu vers l'arrière et
coupez les excès de fil avec le coupe-
fil intégré sur la gauche du plateau de
travail de la machine ou derrière la
barre du pied-presseur.
RÉALISATION D'UN ANGLE
DROIT
Pour faire un angle droit à 16 mm du
bord du tissu, arrêtez la couture en
laissant l'aiguille dans le tissu, quand
vous arrivez au repère (voir croquis).
Relevez le pied presseur et tournez le
tissu.
La nouvelle ligne de piqûre s'alignera
avec le guide couture de 16 mm.
Baissez le pied presseur et continuez
la couture dans la nouvelle direction.
Pour point droit jumelé, régler la
position d’aiguille au milied. Le fil du
côté gauche est enfilé dans l’aiguille
gauche et le fil du côté droit, dans
l’aiguille droite.
Pour fronce réglé la longueur de point
à 4.