


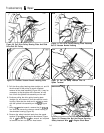
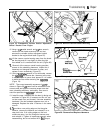
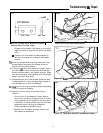
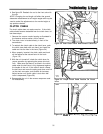

Figure 43. Wrap Drive Belt Around Lower Idler
Pulley And Angled Pulley
DRIVE BELT
1.
The drive belt may be accessed by removing the top,
right, and rear covers as shown in previous sections.
2. Remove the drive pulley bearing plate and slip off the
drive belt as shown in Figures 19
-
21.
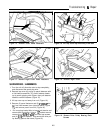
3. Lift the idler pulley spring off the threaded stud, and
release tension on the idler pulley assembly. Note
the path of the belt, then remove it through the back
of the unit (Figure 40).
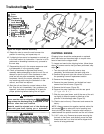
4. Inspect the belt for excessive wear, and replace if
worn out or cracked. Make a loop with the new belt,
and insert it into the rear of the unit, over the pivoting
idler pulley assembly and toward the horizontal trans-
mission pulley (Figure 41).
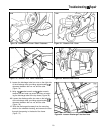
5. Wrap the belt around the transmission pulley,
beveled edge in, and engage the lower idler pulley
and bottom of the large angled pulley (Figure 42).
6. While maintaining light tension on the belt with one
hand, wrap the drive belt around the lower idler pul-
ley and angled pulley, and hold in place with the
other hand (Figure 43).
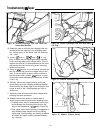
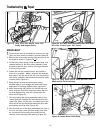
7. Pull the pivoting idler pulley assembly back up into
normal position, wrapping the drive belt around the
upper idler pulley. At this point, the slack loop at the
other end of the belt should be toward the drive belt
pulley plate mounting area (Figure 44).
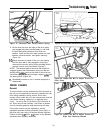
8. Pull the slack end of the drive belt toward the front of
the unit, and loop it over the drive pulley drive shaft
as you place the drive pulley drive shaft into the
vacuum nozzle housing shaft opening (Figure 45).
Figure 44. Pull Idler Pulley Assembly Back And Wrap
Drive Belt Around Upper Idler Pulley
Troubleshooting & Repair
32
Figure 45. Loop Slack End Of Drive Belt Over Drive
Shaft And On To Drive Pulley
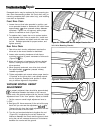
Figure 46. Install Drive Pulley Plate