


Operation
l Hold tree limbs and branches carefully as they are
being put into the chipper cone, releasing your grip
as soon as the self-feeding action of the chipper
knives begin to pull the material in.
l Longer pieces may have a tendency to twirl around
forcefully as they are being drawn into the chipping
knives. Hold the material safely away from the chip-
per cone area until the material is properly controlled
by the chipper cone.
l Never wrap your fingers around tree limbs and
branches, or hold so tightly that you can’t let go
quickly if the tree limb or branch is suddenly and
forcefully pulled into the chipper block chipping
knives. Short pieces may be pushed into the chipper
using longer limbs and branches. Stand to the side
when feeding shod pieces, since they may kick back.
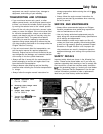
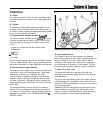
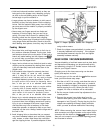
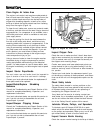
Figure 4. Proper Operator Stance For Chipping
Feeding Material
using another means.
1. Prune tree limbs and large branches to limit size to
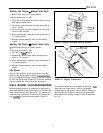
7. Check the chipper cone periodically to make sure it
the maximum diameter allowed. Pruning tree limbs
is securely fastened to the housing.
If the chipper
and branches close to the main portion of the limb or
cone become loosened, stop the unit, and tighten
branch will make feeding into the chipper cone
easi-
assembly hardware securely.
er, and will help you maintain control as the material
is drawn into the chipper block.
FLEX HOSE VACUUM/SHREDDING
2. Large, hard or dried-out tree limbs that tend to resist
chipping can be processed by rotating them manual-
ly as you alternately insert and retract them in the
chipper cone.
3. If the material to be chipped is extremely hard and
kicks back forcefully, or cannot be easily controlled
while it is being fed into the unit, remove the material
immediately and set it aside. You may need to sharpen
the chipper blades to process the material. Consult
the repair section of this manual for sharpening instruc-
tions, or take your unit to an authorized service center.
4. If normal chipping operation begins to require addition-
al feeding force to process material, the chipper
knives may be in need of routine sharpening. See the
repair section of this manual for sharpening instruc-
tions, or take your unit to an authorized service center.
5. Always try to maintain adequate control of the tree
limbs and branches being fed into the chipper cone
to prevent them from whipping around and causing
injury to you or damage to the cone. Larger limbs
and branches may have a tendency to kick back
toward the operator, so always be alert as you feed
materials into the cone. Always, feed the large end of
the limb in first.
6. Avoid chipping limbs or branches that you suspect
may have imbedded objects such as hooks, eyelets,
nails, screws, or other metal items that could dam-
age the chipping knives. If possible dispose of them
Vacuum/shredding of confined areas such as plant beds
and decorative landscaping can be performed quickly
and effectively using the 15’ flexible vacuum hose avail-
able for your Chipper Vacuum.
Changing over to flex hose vacuuming can be done
quickly and requires no tools.
To convert your unit for use with the
20’
flexible vacuum
hose, just follow these easy steps:
1. Shut the unit off if it is running, and allow the rotor to
come to a complete stop. (Make sure any material
being shredded or chipped is completely processed
before stopping the unit.) When the rotor is fully
stopped, no noise or vibration will be noticeable.
2. Set the vacuum intake nozzle flap adjustment to the
closed position.
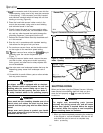
3. Remove the vacuum hose intake plug from the
vacuum hose opening, and store it where it won’t get
damaged or lost (Figure 5). Placing the plug into the
chipper cone opening will keep it readily available
when you want to resume walk-behind vacuuming.
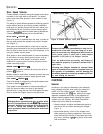
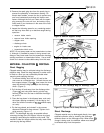
NOTE: When removing the vacuum hose intake plug or
hose connector end, align the seam on the cap or hose
connector with the seam on the
vacuum intake opening,
then pull out to snap it out of the intake opening groove,
and unscrew to remove.
13