


Troubleshooting & Repair
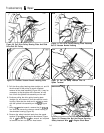
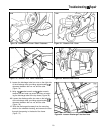
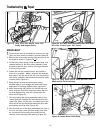
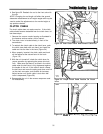
8. Loosen the discharge tube hex nuts on the right side
of the discharge tube, providing approximately
i/8”
clearance between the hex nut and the tube
(Figure 34).
9. Using a l/2” socket wrench and i/2” box wrench,
remove the hex head cap screw and hex nut secur-
ing the discharge tube to the top brace (Figure 35).
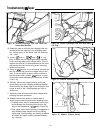
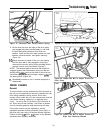
10. Loosen the discharge tube hex nuts on the left side
of the discharge tube, providing approximately
l/8”
clearance between the hex nut and the tube
(Figure 36).
12. Slide the discharge tube away from the mounting
studs on the shredder housing, and remove the tube
through the opening in the back of the frame
(Figure 37).
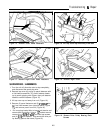
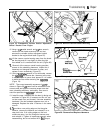
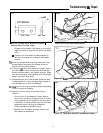
Figure 31. Remove Left Cover
,
igure 30. Remove Left Cover Panel Fasteners
Figure 32. Remove Rear Panel Fasteners
Figure 33. Remove Rear Panel
Figure 34. Loosen Discharge Tube Hex Nuts
29