


Page 2
7014-082B
September 21, 2006
R
CB 1200 Pellet Stove
R
R
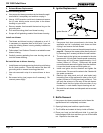
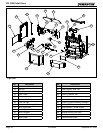
2. Exhaust Blower Replacement
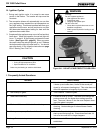
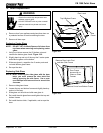
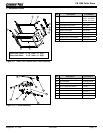
E. Igniter Replacement
F. Bafe Removal
1. Use proper shut down procedures to shut down the
appliance and let it completely cool down and then
unplug it and remove the ash drawer.
2. Follow instructions to remove the ash drawer found on
page 28. Remove the access plate directly above it
by removing the 2 screws just below the ash catcher.
. The wire leads to the igniter are connected to the wire
harness with 1/4 inch male / female spade connectors.
These wires will pull forward approximately 4 to 5
inches (102mm to 127mm). Disconnect the spade
connections and remove the igniter from the chamber.
Loosen the thumb screw and slide igniter out.
4. Install new igniter into the chamber and tighten the
thumb screw. Re-connect the wires to the 2 leads with
the spade connectors.
5. Remove right side panel and pull wire leads back
toward the rear of the appliance to take-up the 4 to 5
inches (102mm to 107mm) previously pulled out. This
will keep the wires out of the way of the ash drawer.
Double check that the igniter wires are clear of any
movement, i.e. ash drawer, repot cleaning rod, etc.
6. Re-install the ash drawer and side panel and re-connect
the power.
1. Use proper shut down procedures to shut down the
appliance and let it completely cool down.
2. Open right side panel and then open the door.
. The 2 bafes are located at the top inside of rebox.
4. Place your hand on the bafe and slide it up and the
bottom edge will fall down and then you can lift the bafe
out. Repeat for the other side.
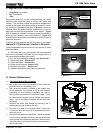
Igniter
Igniter Bracket
Thumb Screw
Figure 32.1
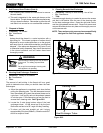
Remove existing blower:
a. Use proper shut down procedures to shut down the appli-
ance and let it completely cool and then unplug it.
b. Use an 11/2" wrench or nut driver to loosen and remove
the (6) nuts holding motor mount plate to the blower
housing on your stove.
c. Remove washer from beneath the terminal ring on the
grounding wire.
d. Pull motor/mounting plate from blower housing.
e. Scrape off old gasketing material from blower housing.
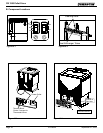
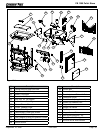
Install new blower:
f. The blower and blower housing is shipped as a unit. It
is necessary to separate them at this point if you are
using the existing blower housing already installed on
the appliance:
g. Follow steps 2 and above. Discard or set aside the new
blower housing.
h. Carefully remove gasketing from new housing and set
onto the blower housing.
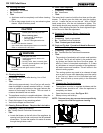
Re-install blower to blower housing:
i. Install blower on housing ensuring that wiring exits facing
the 8 o’clock position. Place the washer and then the
grounding wire on nearest mounting plate stud.
j. Use nuts removed in step b to secure blower to hous-
ing.
k. Re-connect wiring (use jumper wire if necessary). Re-
connect power supply.