


R
R
R
September 21, 2006
7014-082B
Page 21
CB 1200 Pellet Stove
1. A 12 volt AC thermostat is required to operate this pellet
appliance. You may use the included wall mount thermo-
stat or purchase an optional programmable thermostat
or remote control. It is equipped with an adjustable
heat anticipator. The current rating is .05 amps. The
anticipator needs to be adjusted to the lowest setting
available.
2. When mounting a thermostat on a wall, be sure to follow
your thermostat installation instructions carefully.
NOTE: Thermostat must be mounted level for
accurate readings. The thermostat should be
mounted on an inside wall and not in direct line
with the appliance convection air.
NOTE: If the thermostat is located too close to the
appliance, you may need to set the temperature
setting slightly higher to maintain the desired
temperature in your home.
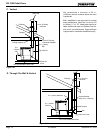
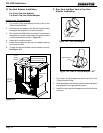
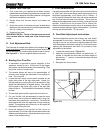
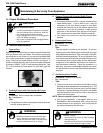
. There is a 4 screw terminal block located on the back
lower left corner of the stove directly above the power
cord inlet. The center 2 screws are for the thermostat
wires.
J. Thermostat Installation
Figure 21.1
Shock hazard.
• Do NOT remove grounding prong from plug.
• Plug directly into properly grounded prong
receptacle.
• Route cord away from appliance.
•
Do NOT route cord under or in front of appliance.
CAUTION
Power Outlet
Terminal Block.
Center 2 screws for
Thermostat Wires
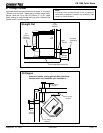
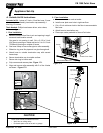
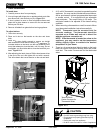
I. Door Installation
To install door:
1. Carefully remove door from packaging.
2. Line up hinges with hinge pins on appliance body, and slide
door down until it sits securely on pins.
Figure 21.1
.
.
I
f door is plated, be sure to clean all plated surfaces and
glass with a glass cleaner to ensure all oils are removed
before your rst burn.
4. Remove all labels from glass before burning appliance.
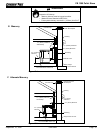
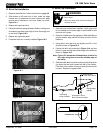
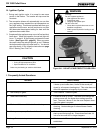
To adjust latches:
1. Close door securely.
2. Place rod in slot on the bracket on the door and close
latch.
. Latch must close tightly enough to ensure an airtight
seal between the door and the body of the appliance. To
increase tension on the latch, turn the rod clockwise a few
turns, then attempt to close the latch, until it is snug. Do not
overtighten; you should be able to close the latch with your
hand.
Figure 21.2
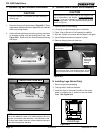
.
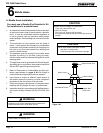
4. After adjusting the latch, place a Phillips head screw driver
in the end of the rod, and tighten the nut with a wrench.
This will maintain the correct tension on the rod and latch.
Hinge
Hinge Pin
R
o
d and nu
t
R
o
d and nu
t
Figure 21.2
Figure 21.3