


52
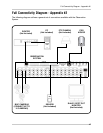
Hard Drive Replacement - Appendix #7
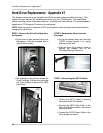
STEP 1: Remove the Drive Cartridge from
the System:
• Lift the lever to gain access to the Lock
Mechanism. Use the provided key to
unlock the drive bay.
• Pull upwards on the lever to loosen the
Drive Cartridge. Pull the drive cartridge
out of the System to access the SATA
Hard Drive.
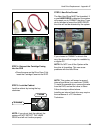
STEP 2: Remove the Cover from the
Cartridge:
• Un-clip the release latch with the word
“OPEN” printed beside it by gently
pushing on the latch.
• Slide the cover off to where it locks or
catches the stopper and lift the
Cartridge Casing to remove it.
STEP 3: Connecting the SATA Cables:
• Confirm the SATA Cable is securely
connected within the System.
• Connect the SATA Data Cable to the
Drive (Cable with two black, one red and
one yellow wire).
• Connect the SATA Power Cable to the
Drive (single red cable).
Hard Drive Replacement - Appendix #7
The System comes with a pre-installed Hard Drive (located in the removable drive bay). This
system will work with two (2) installed hard drives (at a max 750GB each). The steps below
outline installing a drive in the removable bay - if installing an internal drive, it is recommended to
speak with a PC Hardware Technician for assistance.
NOTE: Make sure that the System is OFF and the power cable has been disconnected before
changing the Hard Drive.