


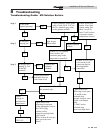


7 Maintenance (continued)
47
Installation & Service Manual
Avoid breathing dust and contact with skin and eyes.
• Use NIOSH certified dust respirator (N95). This type of
respirator is based on the OSHA requirements for
cristobalite at the time this document was written.
Other types of respirators may be needed depending on
the jobsite conditions. Current NIOSH
recommendations can be found on the NIOSH website at
(http://www.cdc.gov/niosh/homepage.html). NIOSH
approved respirators, manufacturers and phone numbers
are also listed on this website.
• Wear long-sleeved, loose fitting clothing, gloves, and eye
protection.
Apply enough water to the combustion chamber lining to
prevent airborne dust.
Remove combustion chamber lining from the appliance
and place it in a plastic bag for disposal.
Wash potentially contaminated clothes separately from
other clothing. Rinse clothes thoroughly.
NIOSH stated First Aid:
Eye: Irrigate immediately.
Breathing: Fresh air.
a. Turn “OFF” main power to the appliance.
b. Turn “OFF” external manual gas shutoff valve to
appliance.
c. Remove the control panel door.
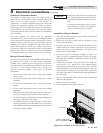
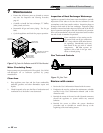
d. Remove the outer air deflector (FIG. 7-2)
e. Disconnect gas valve wiring and remove gas manifold
assembly.
f. Remove ignition wire leading to the pilot assembly
from the ignition module.
g. Disconnect the wiring from the flame rollout/interlock
switch, see FIG. 5-8, page 39.
h. Remove the lower front jacket panel.
i. Remove the control panel mounting screws. When
removing the control panel, lay the control panel to
the side with the wiring intact, being careful not to
damage any of the wiring.
Remove the combustion chamber door. Use caution
to prevent damage to burn ers, refractory, pilot or
wiring.
Inspection and Cleaning
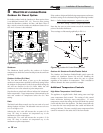
j. Check the heat exchanger surface for sooting. The
external surfaces of the copper tubes should be free of
any soot deposits. (A slight black smudge is normal
with some types of gases.) If abnormal soot deposits
are present, the heat exchanger must be cleaned and
the cause of the soot problem corrected. Proceed as
follows:
k. Remove soot from burners and bottom of the finned
tubes with a stiff bristle brush. Dirt may also be
removed from burner ports by rinsing the burner
thor ough ly with water. Drain and dry burners before
re-installing. Damaged burners must be re placed.
An appliance installed in a dust or dirt con tam i nat ed
atmosphere will require cleaning of the burners on a 3 to 6
month schedule or more often, based on severity of
contamination. Contaminants can be drawn in with the
combustion air. Non-combustible particulate mat ter such as
dust, dirt, concrete dust or dry wall dust can block burner ports
and cause non-warrantable failure. Use extreme care when
operating an appliance for temporary heat during new
construction. The burners will probably re quire a thorough
cleaning before the appliance is placed in service.
l. Remove gas manifold as described in steps a. thru e. in
“Heat Exchanger/Burner Access.”
m. Loosen mounting screws and remove front control
panel.
n. Loosen screws on the upper front jack et panel and
remove toward front of the appliance. Use caution to
prevent damage to re frac to ry on the doors inner
surface.
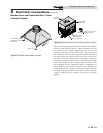
o. Check “V” baffles on top of the heat ex chang er.
Remove and clean if necessary.
p. Remove soot from the heat exchanger with a stiff
bristle brush. Soot may also be re moved from the heat
exchanger by washing thoroughly with detergent and
water. Remove the heat exchanger before using water
for cleaning. Rinse thoroughly and dry before
re-installing. Use a vacuum to remove loose soot from
surfaces and in ner chamber.
q. Remove the heat exchanger (HEX) filler bracket
(FIG. 7-2).
r. The heat exchanger can be removed by sliding towards
the front of the appliance. Once the heat exchanger is
removed from the ap pli ance, a garden hose can be used
to wash the tubes to ensure that all soot is removed
from the heat exchanger surfaces.