


EN 65
TW
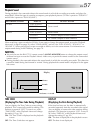
Random Assemble Editing
Using the RM-V711U remote control, you can use P.AE/Effects and make an original edited tape.
1
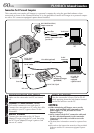
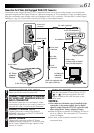
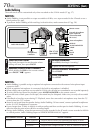
MAKE CONNECTIONS
Make sure that the playback picture and sound
are available on the connected TV (੬ pg. 58).
•Connections should be made while the power
is off. Making connections with the power on
can lead to electrical shock or malfunctions.
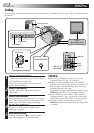
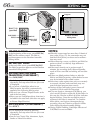
2
START SOURCE PLAYBACK
First turn the Power Dial to “PLAY” while
pressing down the lock button located on the
dial. Press PLAY and then press R.A. EDIT ON/
OFF on the remote control. Make sure to point
the remote control at the camcorder’s remote
sensor.
•The Random Assemble Editing Menu appears
on the TV screen or the LCD monitor.
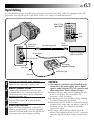
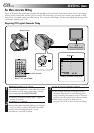
3
EXECUTE FADE/WIPE IN
(IF NECESSARY)
Press FADE/WIPE on the remote control.
•Cycle through the effects by pressing
repeatedly, and stop when the one you want
is displayed.
•You can’t use a Picture Wipe/Dissolve at the
beginning of Program 1.
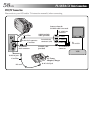
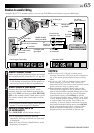
Source tape (Camcorder) New tape (VCR)
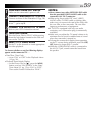
NOTES:
●
When using a JVC VCR with a remote pause
terminal, connect the EDIT jack on the camcorder to
the VCR’s remote pause terminal using an editing
cable.
●
If you use a JVC VCR not equipped with a remote
pause terminal or a non-JVC VCR, connect the
camcorder's EDIT jack to the remote control's remote
pause connector using an editing cable.
●
Before Random Assemble Editing, make sure the
indications don't appear on the TV monitor. If they
appear during Random Assemble Editing, they will be
recorded onto the new tape. To clear the Playback
Sound Mode Display, press DISPLAY on the RM-
V711U Remote Control. Select “DISPLAY” and “TIME
CODE” from the Playback Menu (
੬
pg. 56) to show
or hide the Date/Time and the Time Code on the
recording. To show or hide all indications except for
the Random Assemble Editing Menu, press ON/OFF
on the camcorder for longer than 1 second. When
Random Assemble Editing starts, its indications
disappear and are not recorded on the new tape.
VCR
(Recording deck)
To remote
pause connecter
To AV OUT connector
To
VIDEO IN
connector
To S-VIDEO
IN connector
To AUDIO IN
connector (L/R)
To EDIT jack
Core filter
Remote sensor
To S-VIDEO OUT
connector
RM-V711U
Editing cable
(provided)
PLAY
R.A. EDIT
ON/OFF
VIDEO/AUDIO
cable (provided)
S-VIDEO cable
(provided)
White to AUDIO L
Red to AUDIO R
Yellow to VIDEO
Core filter
CONTINUED ON NEXT PAGE
Core filter