


23
Operation
Familiarize yourself with the controls of the GF 300 DV.
Make sure that anyone else using the appliance is also
familiar with the controls and operation procedures.
Always follow the Lighting Instructions on the inside
back cover of this manual and also located on the Rating
Plate attached to the burner assembly.
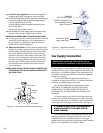
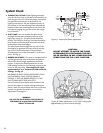
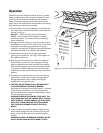
1. Once the pilot is lit, burner operation is controlled by
the rocker switch located at the left corner of the rear
shroud. See fig. 39.
ON / OFF - use for manual control of the burner.
T-STAT - use for optional thermostatic or remote
control operation. The burner will be controlled by
those accessories.
2. During the first few fires, you may notice odor and/or
smoke from the stove. This is normal and results from
burn-off of manufacturing residue and curing of
materials. You may find it helpful to provide additional
ventilation and fresh air to alleviate this condition.
3. Condensation may occur on the glass upon each
lighting of the appliance. This “fog” will disappear as
the appliance heats up.
4. Keep the controls and the area under the appliance
free of debris, vacuum this area frequently. Always
keep the appliance area clear and free from combus-
tible materials, gasoline and other flammable liquids.
If a vacuum is used during any service on the stove,
ALWAYS be sure the stove is cold and there are NO hot
embers.
5. Remember, this appliance has a continuous burning
pilot flame. Exercise caution when using products
having combustible vapors. Always shut-off gas
supply while servicing the stove.
6. CAUTION: DO NOT OPERATE THIS APPLIANCE WITH
THE GLASS REMOVED CRACKED OR BROKEN.
Replacement of the glass should be done by a licensed
or qualified service person. Use only replacement
glass provided by your authorized Jøtul dealer. Never
use any substitute materials.
WARNING: OBSERVE CAUTION WITH THE GLASS. THE
GLASS PANEL MAY SHATTER UNEXPECTEDLY IF STRUCK
WITH AN OBJECT. ALWAYS HANDLE THE GLASS PANEL
WITH CARE. WHEN SERVICING THE STOVE ALWAYS
PULL THE GLASS ASSEMBLY STRAIGHT UP FOR RE-
MOVAL.
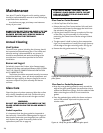
7. Clean the glass only when necessary. Wipe surface
with a clean, damp soft cloth. Follow with a dry, soft
towel as desired. Take care not to scratch the glass
surface.
WARNING: DO NOT USE ABRASIVE CLEANERS ON THE
GLASS. NEVER CLEAN THE GLASS WHEN IT IS HOT.
Figure 39. Burner Switch and Optional Blower Controls
BURNER
BLOWER
ON
OFF
TSTAT