


ZIO
®
/ZIO PLUS LCD WALL MODULES
3 63-2719—03
SETUP AND CONFIGURATION
Initial Setup and Configuration
Once the wall module is wired to the controller, you configure
the wall module using the PC-based, Niagara Workbench
Tool. Refer to the applicable programmable controller User’s
Guide. (Refer to the Honeywell Spyder User’s Guide, form 63-
2662, or the ComfortPoint Programmable Controller User’s
Guide, form 63-2663, depending on the programmable
controller used.) This tool is used to configure the wall module
for either the Spyder or the ComfortPoint programmable
controller.
Confirm Bus Address Setting
Check to ensure that the Wall Module’s bus address dial
(located on the back of the module) is set to match the setting
in the configuration tool. TR70 models can be set from 1–5
and TR71/TR75 can be set from 1–10 (0 on the Zio address
dial is equal to 10 in the configuration tool). The address must
be different for each device on the Sylk bus. Up to four Zios
per Spyder are allowed with any combination of TR71/TR75s
and up to three Zios are allowed if one or more is a TR70
model.
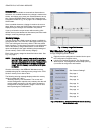
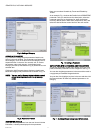
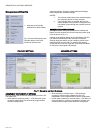
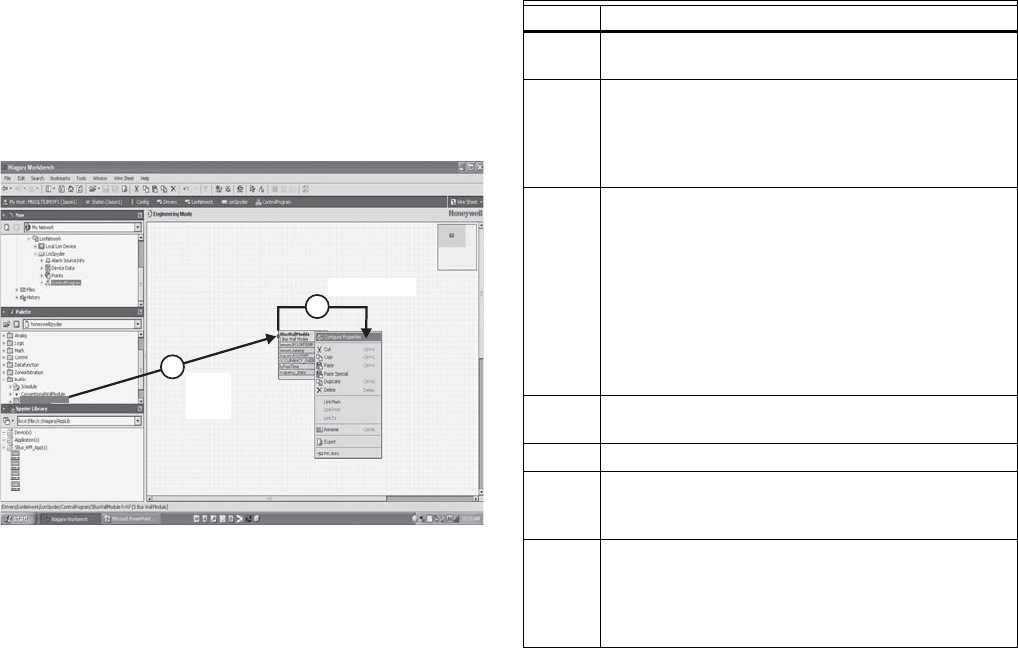
Selecting the Wall Module
You will use the Sylk S-Bus wall module function block from
the Palette’s Built-In folder (see Fig. 3). This configuration has
nothing programmed except the room temperature parameter
and occupancy status.
1. Add the Sylk S-Bus Wall Module function block to the
wire sheet via a left click, drag, and drop. See callout 1
in Fig. 3.
2. Right click on the S-Bus Wall Module function block to
open the Configuration Properties menu. See callout 2
in Fig. 3.
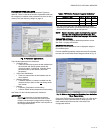
3. Left click on the title, Configuration Properties. This
action starts the Configuration Wizard. The Configura-
tion Wizard steps (see Fig. 5 on page 4) are used to
configure the wall module.
Fig. 3. Niagara Tool Interface - S-Bus wall module selection.
TR71/TR75 Labels
The TR71/TR75 allows the use of the following special
characters in label fields such as Categories and Parameter
Names: underscore ( _ ) to insert a space, hyphen ( - ), and
forward slash ( / ). The TR70 allows use of the underscore
( _ ) character to insert a space.
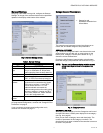
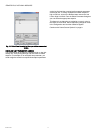
Navigation and Memory Usage
The Honeywell Spyder Tool uses an intuitive, window-based
interface. A Help button on each screen provides assistance
with any entry or process.
IMPORTANT
Use the Help button to display context specific help
for the current window or pane display. See the lower
left corner of Fig. 6 on page 5 for the location of the
Help button.
NOTE: At any time, clicking the Preview button (lower left of
main window, see Fig. 6 on page 5) displays the
updated wall module LCD as a pop-up. Preview sim-
ulates the actual wall module interface and allows
you to verify the operation of the current configura-
tion of the wall module. See “Preview” on page 16.
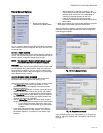
Navigation
Table 3 describes the navigation buttons at the bottom of the
wall module window. See the bottom of Fig. 7 on page 5 for
the location of these buttons. Buttons are greyed when
unavailable.
VAV_Temp_NoBal_NwOvrdTime
VAV_Temp_MnMxBal_NwOvrdTime
VAV_Temp_KfacBal_NwOvrdTime
VAV_Temp_NoBal_AllOverride
SBusWallModule
M27820
RIGHT CLICK
DRAG
AND
DROP
1
2
Table 3. Navigation Buttons.
Item Function/Use
Help When clicked, this button provides context sensitive
help for the currently selected item or parameter.
Preview When clicked, this button displays the updated wall
module LCD in a pop-up window pane. Preview is
fully interactive and simulates the actual wall
module interface as currently configured (see
“Preview” on page 16 for details).
Save to
Library
For new custom configurations and standard
configurations.
Clicking the button opens the Save to Library
screen (shown in Fig. 25 on page 17). This action
allows you to save the entire current wall module
configuration.
The Save to Library button is disabled until you
change the configuration (application). After a
change is made, you can save the new
configuration into the library under a new name.
Back Takes you backward one step in the wizard
interface.
Next Takes you forward one step in the wizard interface.
Finish Clicking this button commits all changes to the
database, closes the Configuration Wizard, and
returns you to the wire sheet.
Cancel Prompts you with a confirmation message.
If you reply Yes, then all selections/entries made
since the Save to Library button or Finish button
was last pressed are ignored, and the wizard
interface quits.