Hellenbrand H-150 Series Water System User Manual


37
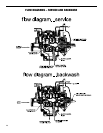
Reattach the drive cap assembly and the piston(s) and the
drive assembly.



the electronics and establishes the service piston posi-


position.
Injector Cap, Screen, Injector Plug and Injector Re-
placement









-


Rell Flow Control Assembly or Rell Port Plug

elbow-locking clip and then pull straight up on the elbow.
Replace the elbow locking clip in the slot so that it is not
-


screwdriver.






pushing the retainer into the elbow until the o-ring seats.
Remove locking clip, push down on elbow to reseat and
insert locking clip.
Do not use Vaseline, oils, or other unacceptable lubricants
on o-rings. A silicone lubricant may be used on the o-ring
on the elbow or the white retainer.
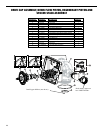
Water Meter or Meter Plug
The water meter assembly is connected to the PC board

replaced, remove the control valve cover and disconnect



assembly and through the drive back plate. To reinstall,
rethread the water meter through the drive back plate and

and the water meter and power plugs.


and cleaned. To remove the water meter assembly, un-
screw the meter cap. Pliers may be used to unscrew the


-
tween the valve body and the meter. When the meter is




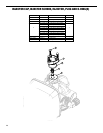
Do not use a wire brush to clean the turbine. Wipe with

or vinegar. The turbine can be immersed in the chemical.

damaged or the bearings on the turbine are worn, replace
the turbine.
-
ings are prelubricated. Do not use Vaseline, oils, or other
unacceptable lubricants on the o-ring. A silicone lubricant
may be used on the black o-ring.

into the slot. Hand tighten the nut. Do not use a pipe
wrench to tighten nut.